Cyberpunk 2077 Photomode Prop Setup Guide
In this guide I will show you how to add a prop to your pose that spawns immediately in game. I am assuming that you know how to make poses and understand the no-prop version process so none of that is explained in this tutorial, just how to add a prop. If you are unsure how find the name for the item you want to use I have an item extraction guide that explains it!If anything is unclear or you have any questions at all about pose making in general you can always shoot me a message on Discord (you will have to send a friend request first). I am happy to help. :)
Discord: DeavenExe
What you should know/get before starting
- xbaebsae's PM prop file. You must get this for some of the files needed to get started.- Have a pose pack set up in Wolvenkit like you normally would without having added the poses to the anims file.- This tutorial is written assuming you make your own XL and YAML files. I make the files myself so I don't know how to use the program to add the items.- If you can't properly read an image just right click and open in a new tab. It'll be bigger and easier to read.
Last Updated: March 6th 2025
Added a tip for adding props to models with IK bones to stop the bones from becoming small in the Posing in Blender part.
Guide Setup
This guide is split up into several parts. Click any of the titles below to be taken to that part of the tutorial.Initial Setup
Pathing Explanation
Pathing Your Item
Posing in Blender
Last Steps
Mesh Cleanup
Initial Setup
Copy the source folder from the PM prop file linked above in the what you should know section and paste it into your wolvenkit project file.
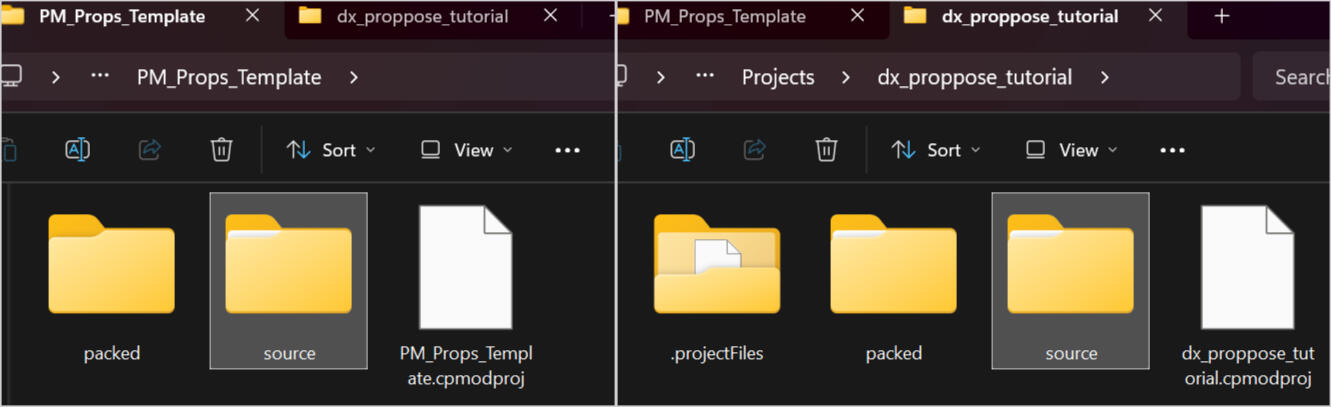
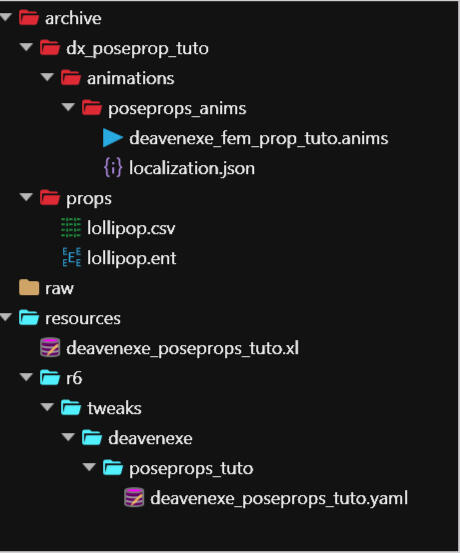
Your project should have a bunch more files now in wolvenkit. It looks a little messy but we can get to clean up after some paperwork.
Alright lets edit some files so we can clean up after and keep things neat and organized. .We're going to edit the xl file under resources and the yaml file under tweaks. It's honestly a really easy copy paste.xl first. Open both xl files and copy the line that is in PM Props Template and then paste it into your own xl file. Save your own file and close both. Don't worry about renaming this yet. We will get to that later.
Next is the yaml file. It's pretty much the same thing. Open both your own and the PM_Props_Example.
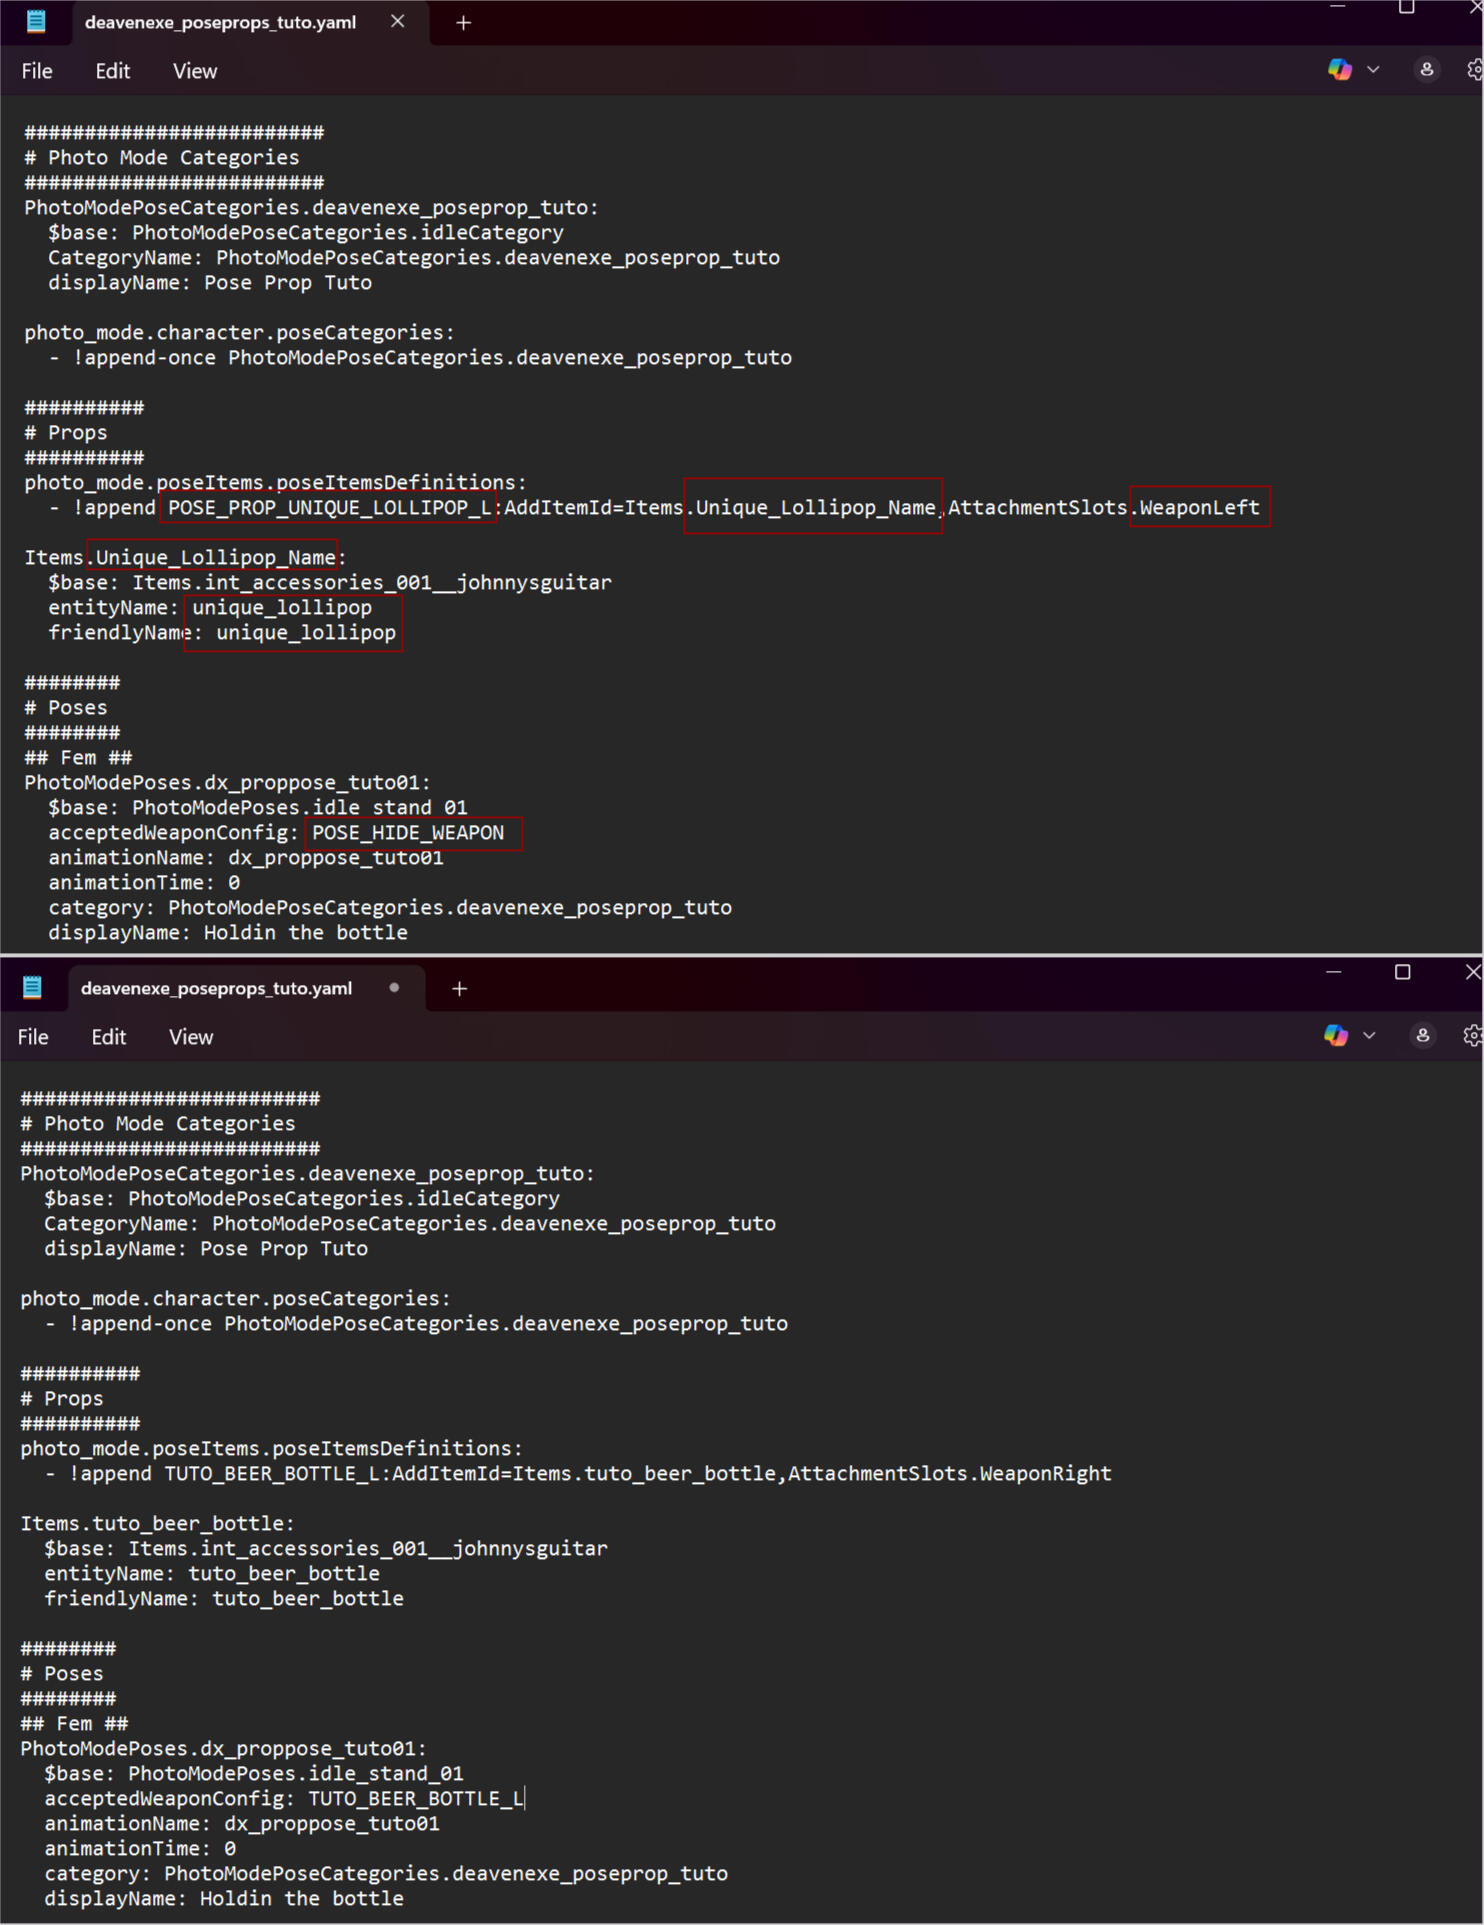
Copy the photo_mode.poseItems and the Items.Unique_Lollipop_NAME and paste them into your own yaml file.I make a separate area for Props as you can see in the screenshot. I do this to make things more clear and easy to find for myself. It's up to you where you want to put things.
Save your yaml file and go back to Wolvenkit!
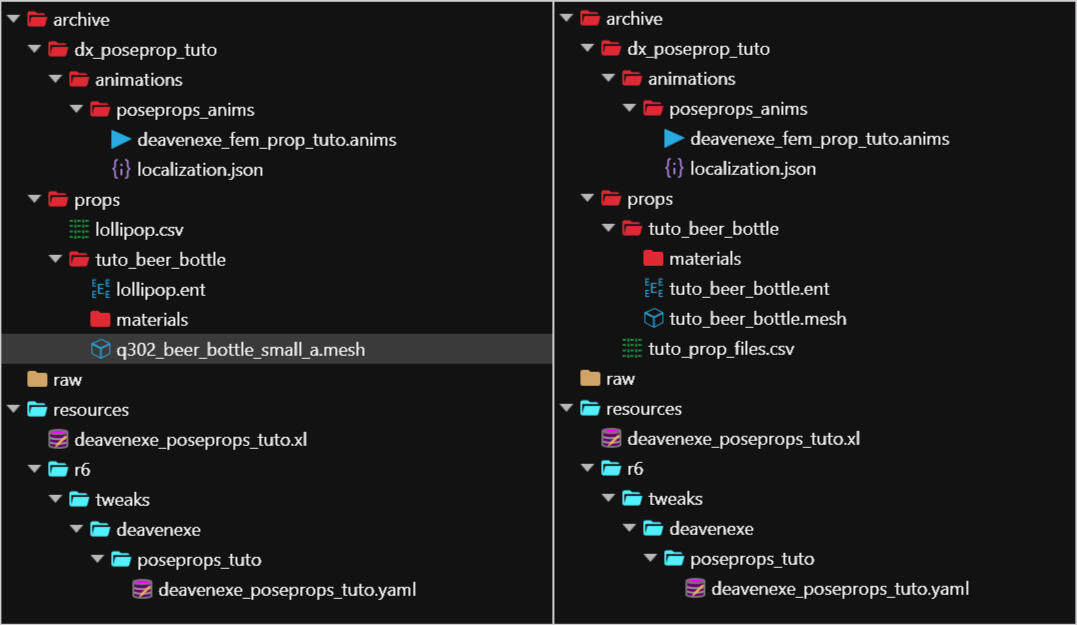
Now there is still one file left, PM_Props_To_Pose_Example but you can entirely ignore it. It's there to show you where to add the prop into the pose in the yaml file. I will show you this later in the tutorial when we rename things.You can now remove the PM_Props_Template.xl, PM_Props_Example.yaml and PM_Props_To_Pose_Example.yaml files that have come from the Props file. You no longer need them for this and having them double can make your pose pack not show up or crash your game.This is also the time we'll sort out the other files we have ignored so far. You can delete the materials and the lollipop mesh. Right click on archive, add a new folder and name it props or whatever else works for you. Move the csv and ent file there. Your project should look something like this:
Pathing Explanation
Alright this is a bit long but we are about to jump into getting the item and pathing so it shows up in your pose. I want to explain pathing for a bit since there is two ways of doing it and it's good for you to know this so you can choose what works for you.So the two ways of pathing are pulling from the game and making things local.When pathing directly from the game your file size will be smaller and there is less pathing work to do. The downside however is that if people are using replacers for the item you want to use then that item will show up instead of the one you intended. So let's say you use a nicola can and someone has a mod that replaces the nicola cans with a cat statue then they will have the cat statue show up. Not ideal.The only time I personally path directly from the game is when I use props from other people. People will have to download the prop pack required but it's someone else's mod you are using for yours so it's the respectful thing to do. Plus they may not allow for you to make them local so always check their permissions or ask them if you are unsure! Don't want to possibly get reported for stealing.When making things local the item becomes part of your mod. No replacer will mess with it so it will be exactly what you have in mind! Another upside is, if you know how to do it, you can change things like colors. I won't be going into how to do those things in this tutorial but it is possible to do when it's local. Downside is that it takes a few more files and pathing things. It also make your file size bigger.It's all a personal preference. Anyway on to pathing and stuff.
Pathing your item
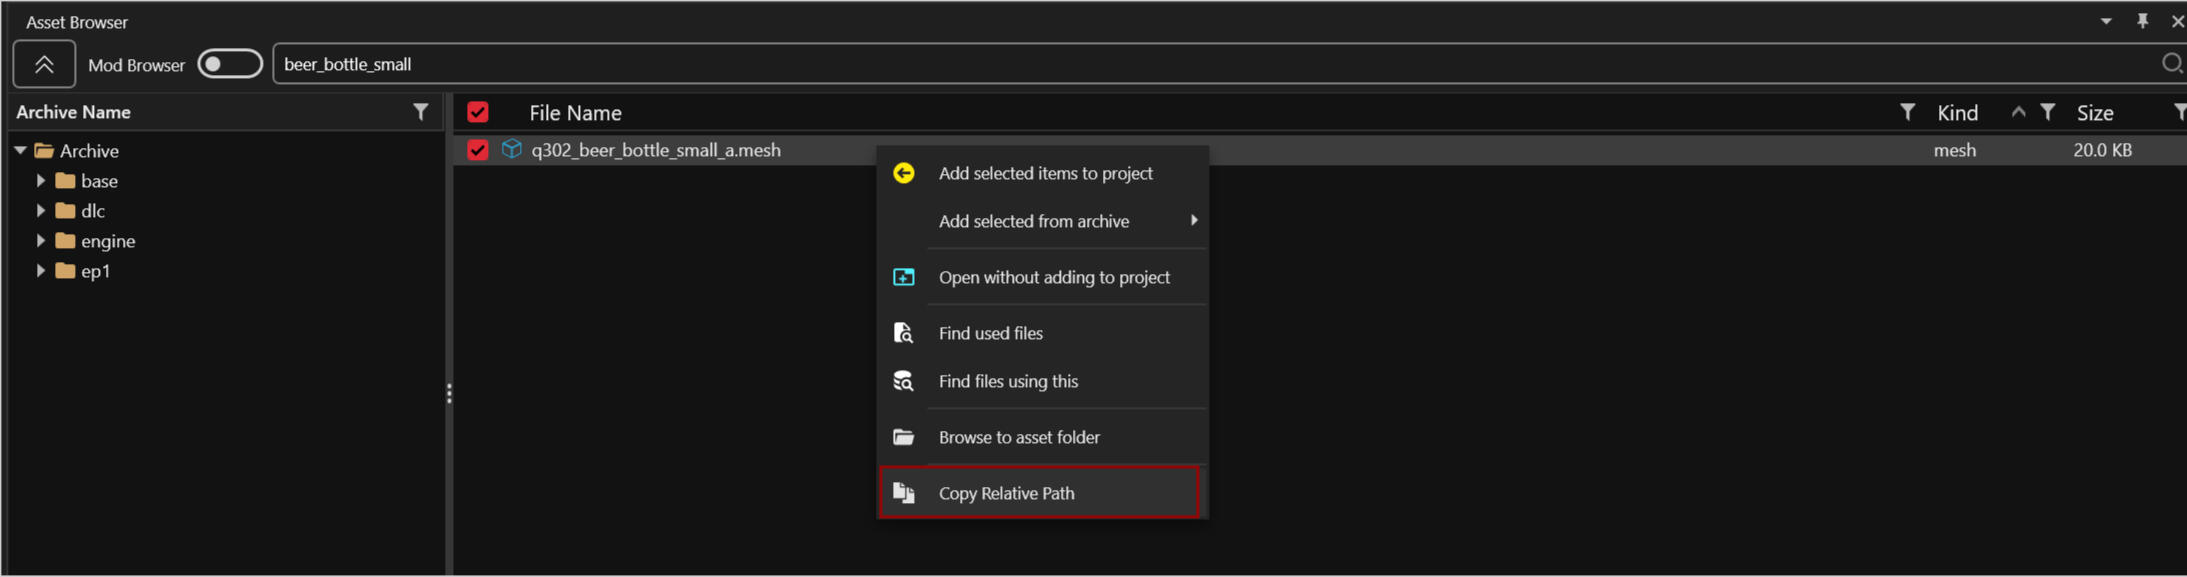
Alright time to grab our mesh! For this tutorial I will use a beer bottle. Adding a quick screenshot to show you can pull the path you need for the ent file by right clicking the mesh. This is only if you want to pull it from the game and not make it local. You will still need the mesh for posing in blender.
I added the mesh, made a new folder for it and put the mesh and ent in there. For organization purposes its smart to make folders especially when you want to add multiple items to a pose pack. I also added a materials folder in the beer bottle folder because I am making everything local.Rename the mesh if you want and rename the ent file to indicate what item it is for (right click the file and select rename). You will need a separate ent file for every single item you plan to use. You can copy and paste the ent file and adjust the things per item.Rename the csv file to match the pose pack. You only need one csv file. We can add multiple items into it if needed.
Let's get into the csv file first! Double click it to open. We're going to change things under compiledData and data. Click the little arrow to open them up. unique_lollipop has to be changed to the item name. This name will have to match later in the yaml. To make it easy on yourself use one general name for all the files. As you can see in the screenshot I turned it into tuto_beer_bottle which is the name i use for the ent and the mesh and I will use later in the yaml. It just make things easier.
You also need to path the ent file in the csv. There are two ways to get the path. There is a little copy icon that appears when you hover over the file, click that and then paste the path into the right place. If you don't see the icon you can right click on the file and select Copy relative path to game file. Paste it into the right place.
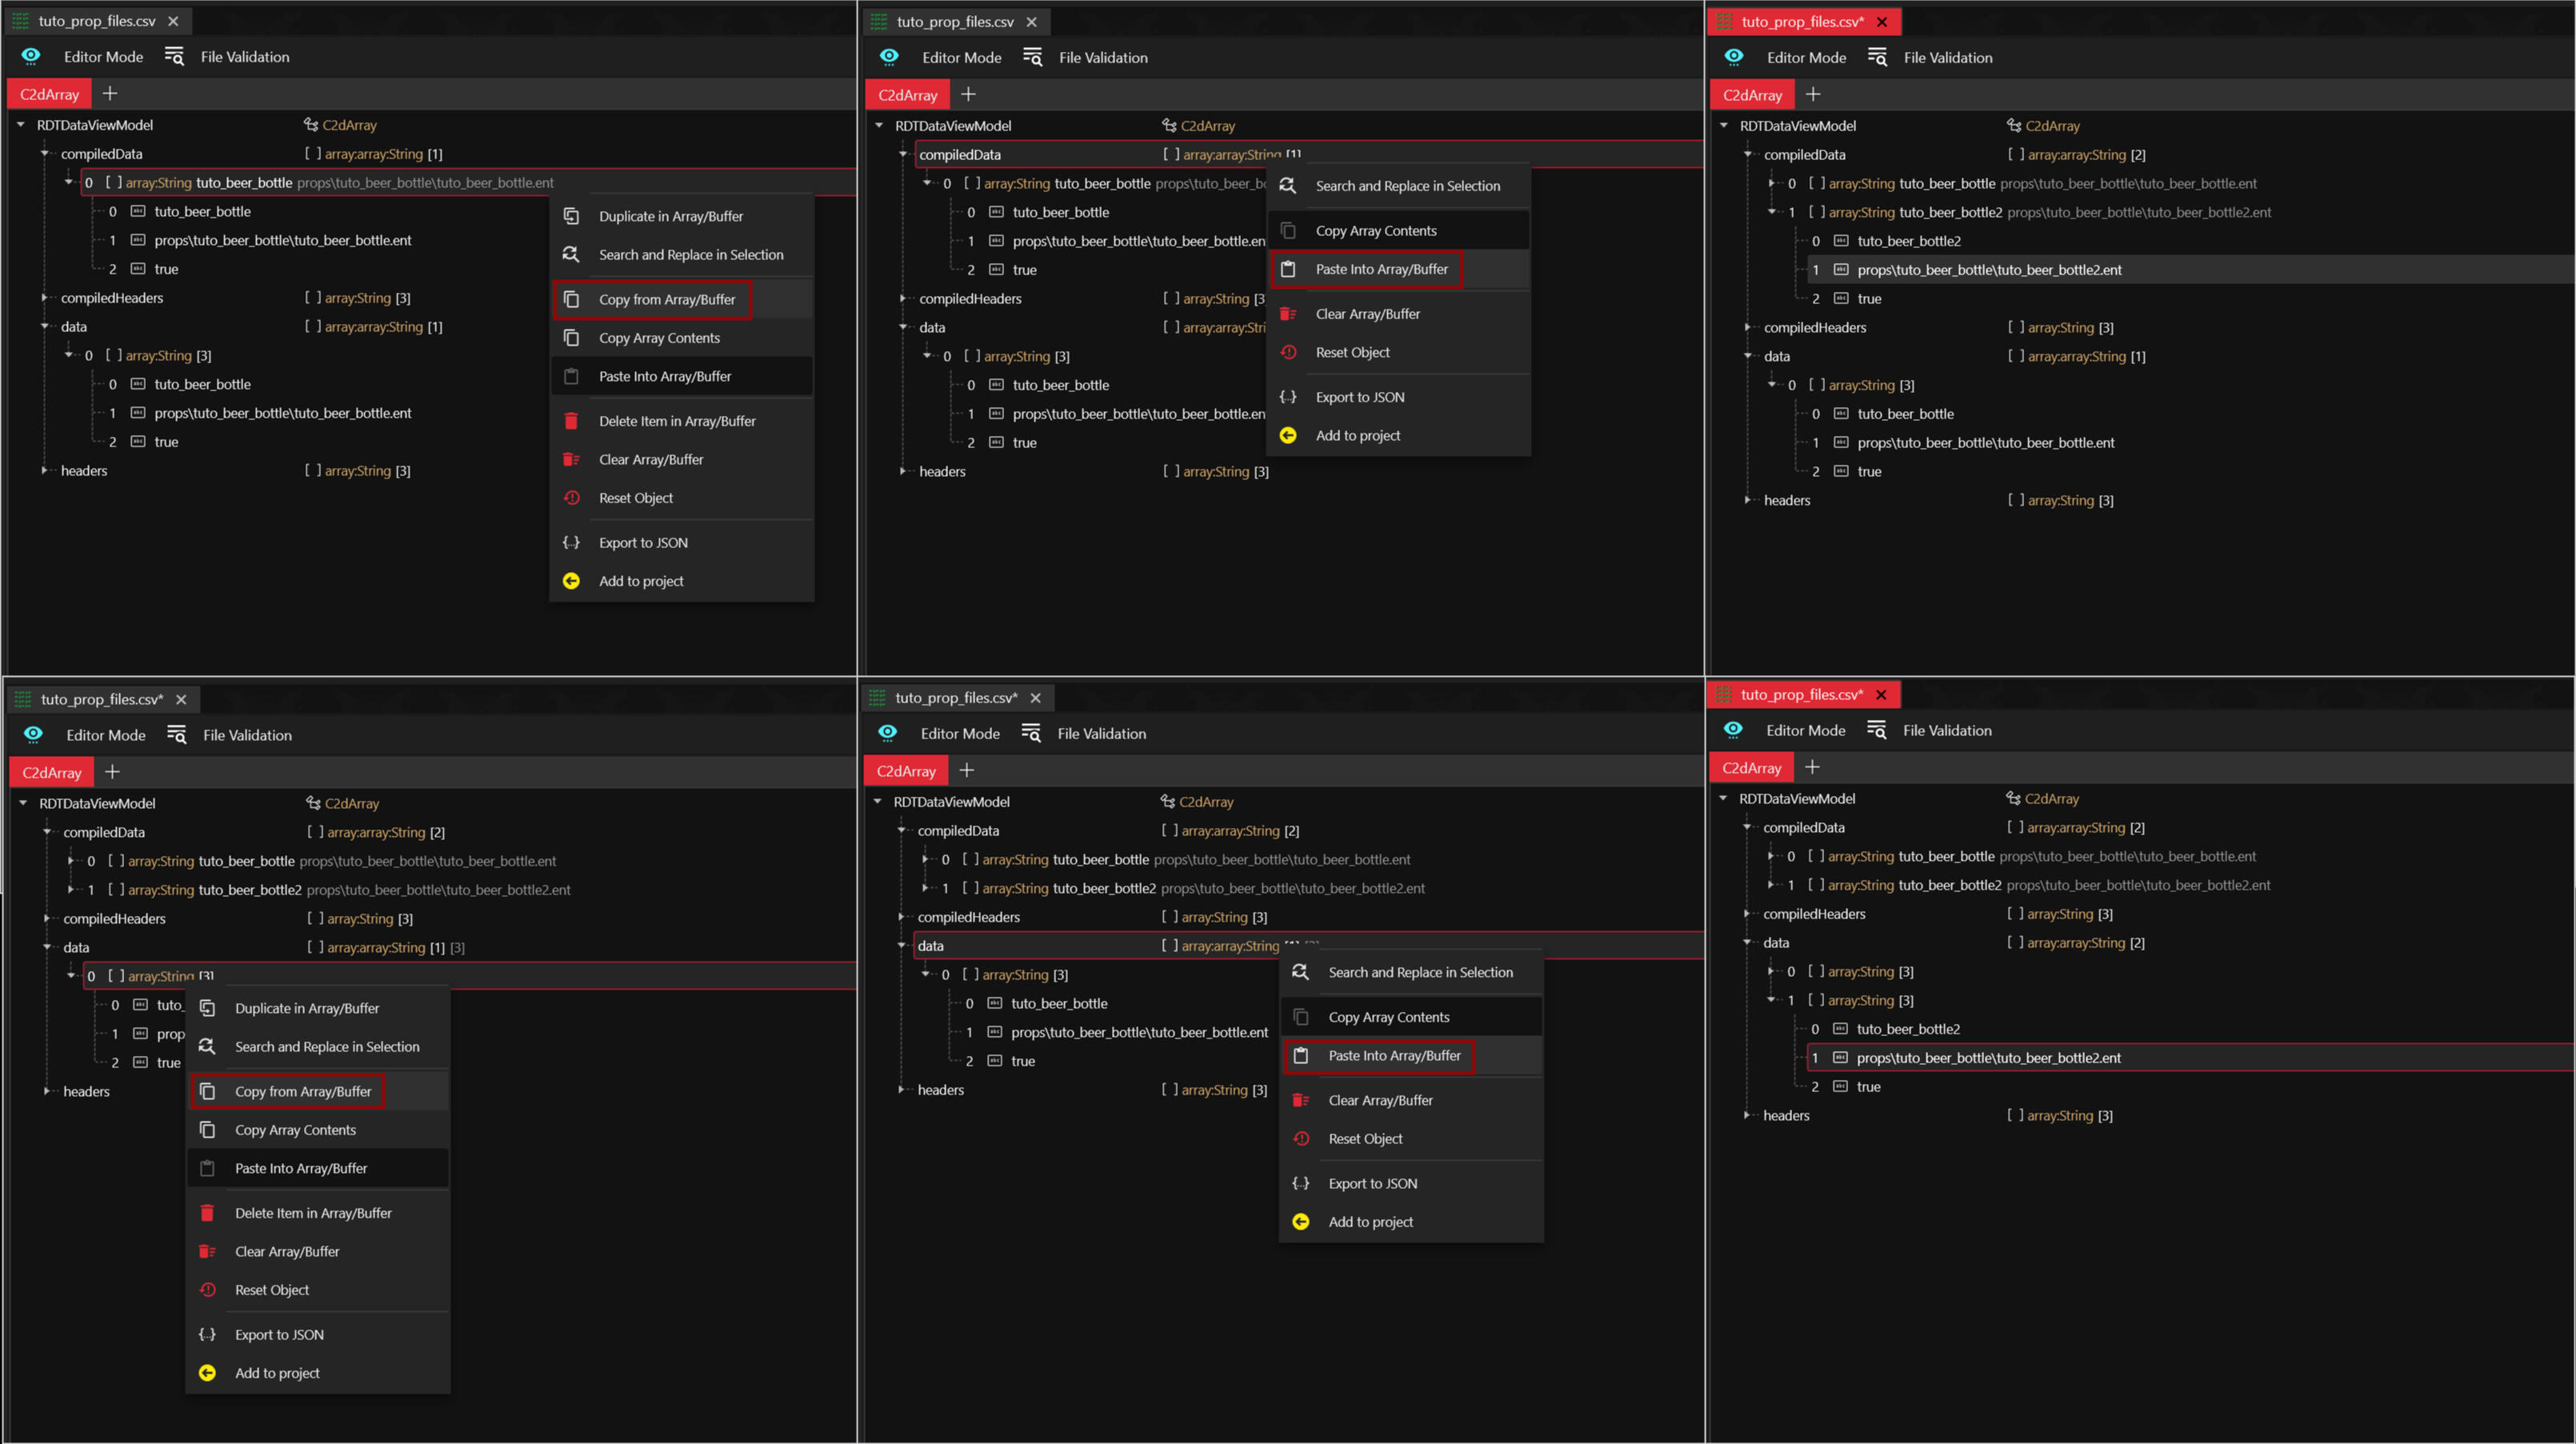
If you want to use multiple items in your pose pack you can copy the data and paste it in again. Select and right click the arrayString. Select Copy from Array/Buffer then click on the compiliedData line above it. Right click again and select Paste Into Array/Buffer. It will add in a new line with the same settings as the first. Adjust the name for the new item and ent path.The same is done for the data area. Select and right click the arrayString, select Copy from Array/Buffer. Then click on the data line above it, right click and select Paste Into Array/Buffer. Adjust the names accordingly and press save in the top left of wolvenkit.You have to do this for every single item you want to use.
Don't forget to save your csv file! Then close it as we are done with it for now. Double click your ent file next. Open up the tab called microphone, ignore the rest it can stay as is. Here we want to copy and paste the path of the mesh. You get the path the same way as above but now just from the mesh file. If you don't want to make your mesh local but instead pull directly from the game find the mesh in the asset browser and copy the path right from there, as shown at the start of this section.Change the name and if need be the meshAppearance aswell. You can figure out which appearance you want by double clicking the mesh. Speaking of which press the save button again and then double click the mesh file if you are making the prop local. We have stuff to do there!
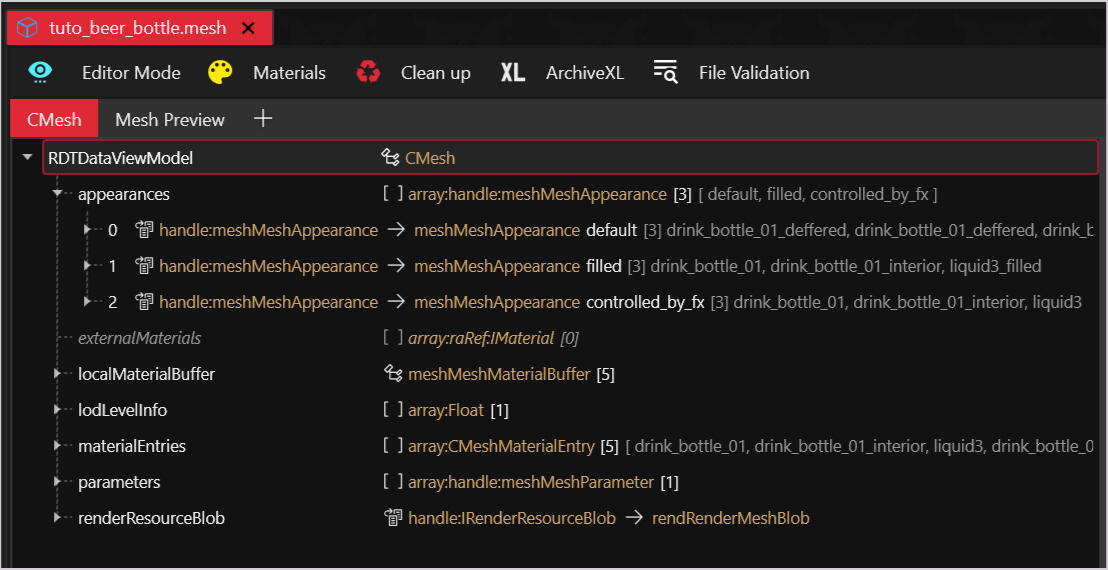
Okay so meshes can be really overwhelming if you have never worked with them before so I am going to do this is small steps with images and hope it's clear and easy to follow.Quick note: if you do not wish to make your prop local and just pull from the game then you can skip this part.The image below is what you will see when you open your mesh. Appearances is exactly what it is, the appearance of your item. It's the name from there you want to fill in in the ent file behind meshAppearance. Some meshes have only 1 appearance others can have 5 or 6 depending on the item. Modded items can easily have a lot more depending on colors and patterns added.Now this is getting a little ahead of ourselves but I'm adding this here just in case already. Let's say you are using only one item for your pose pack but you want different appearances for different poses then you will need a separate ent file for each appearance. You can copy the first ent file and paste it into the project. Rename it for the right appearance and also adjust the meshAppearance in the ent. Do not forget to add it to the csv file.
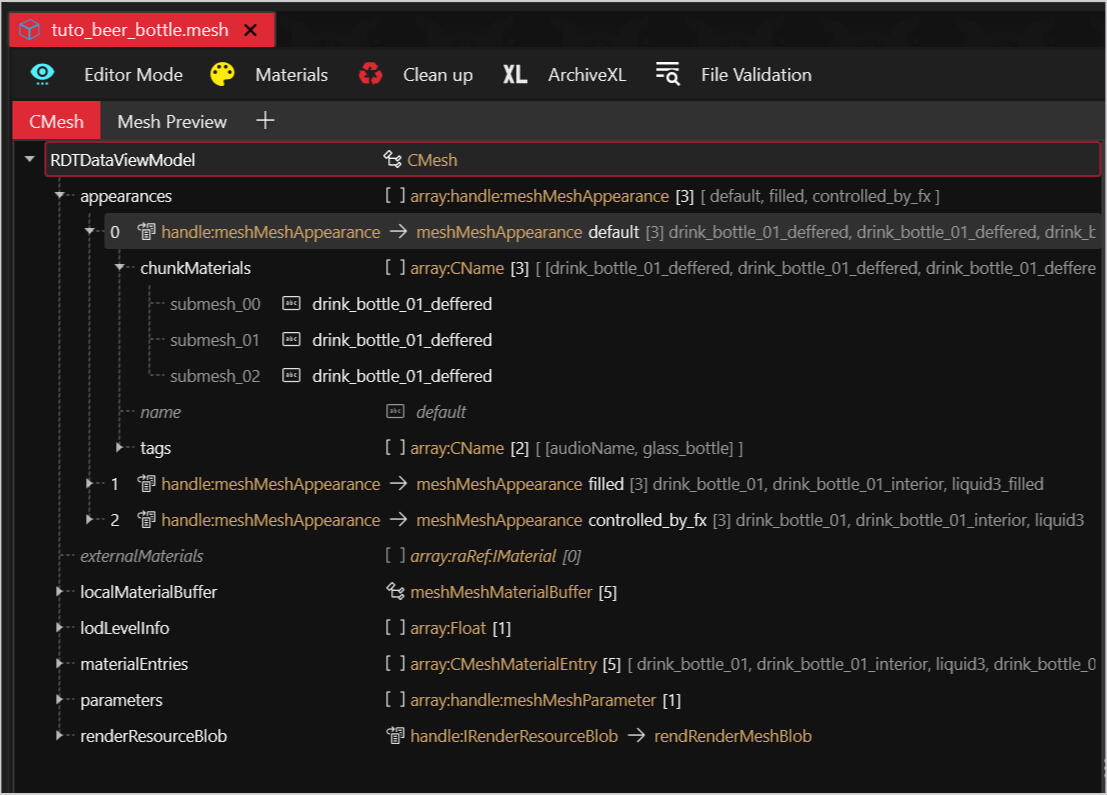
In this case I want to use the default appearance so I do not need to edit the appearance in the ent file. Open up the appearance that you want by clicking the little arrow to the left of it. You will now be able to see the chunkMaterials. These decide what different parts of an item look like. You need to know this so you will be able to get to the right materials. While for the appearance I'm using it's all the same you can also see behind the filled appearance beneath it that there are two similar submeshes and one different. This really depends per appearance so it is always smart to check!
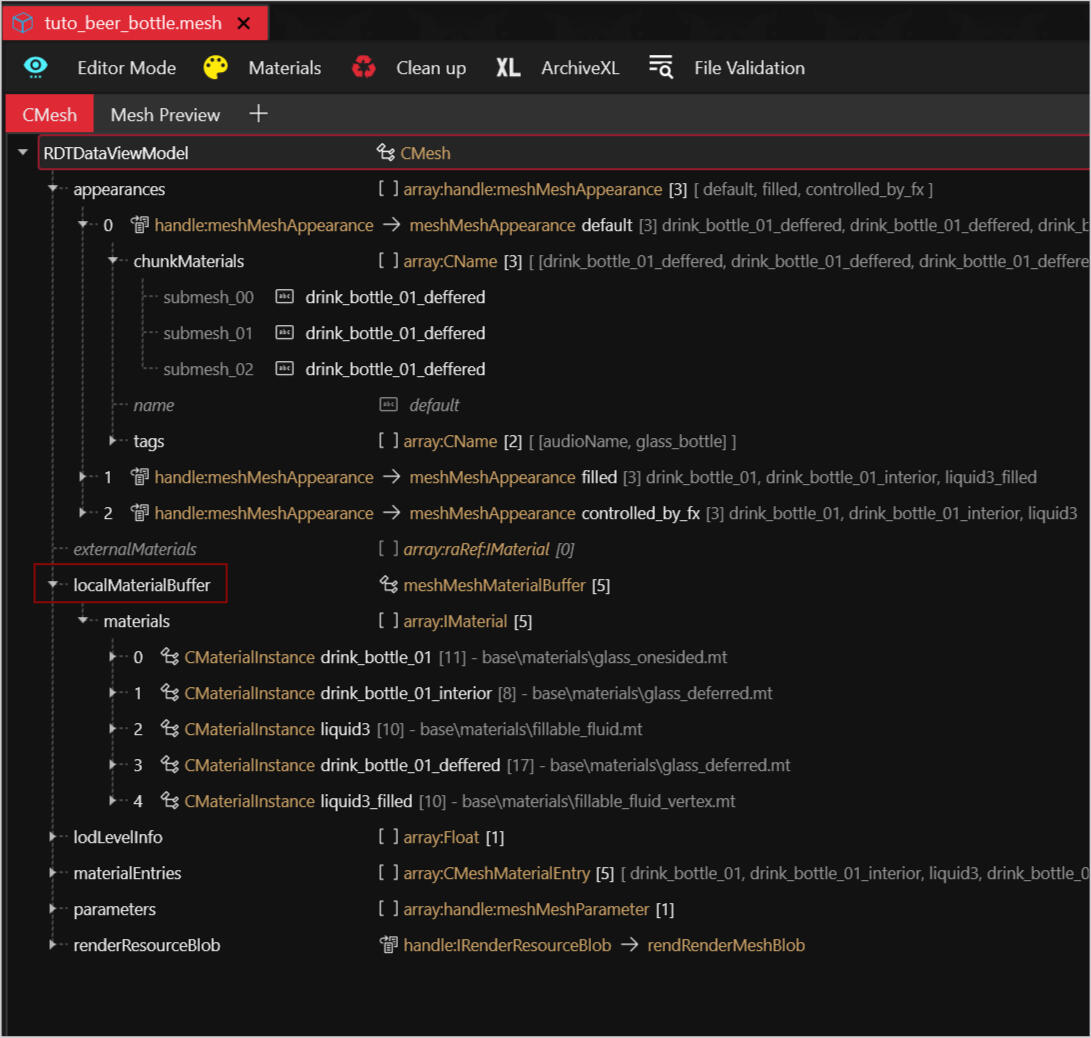
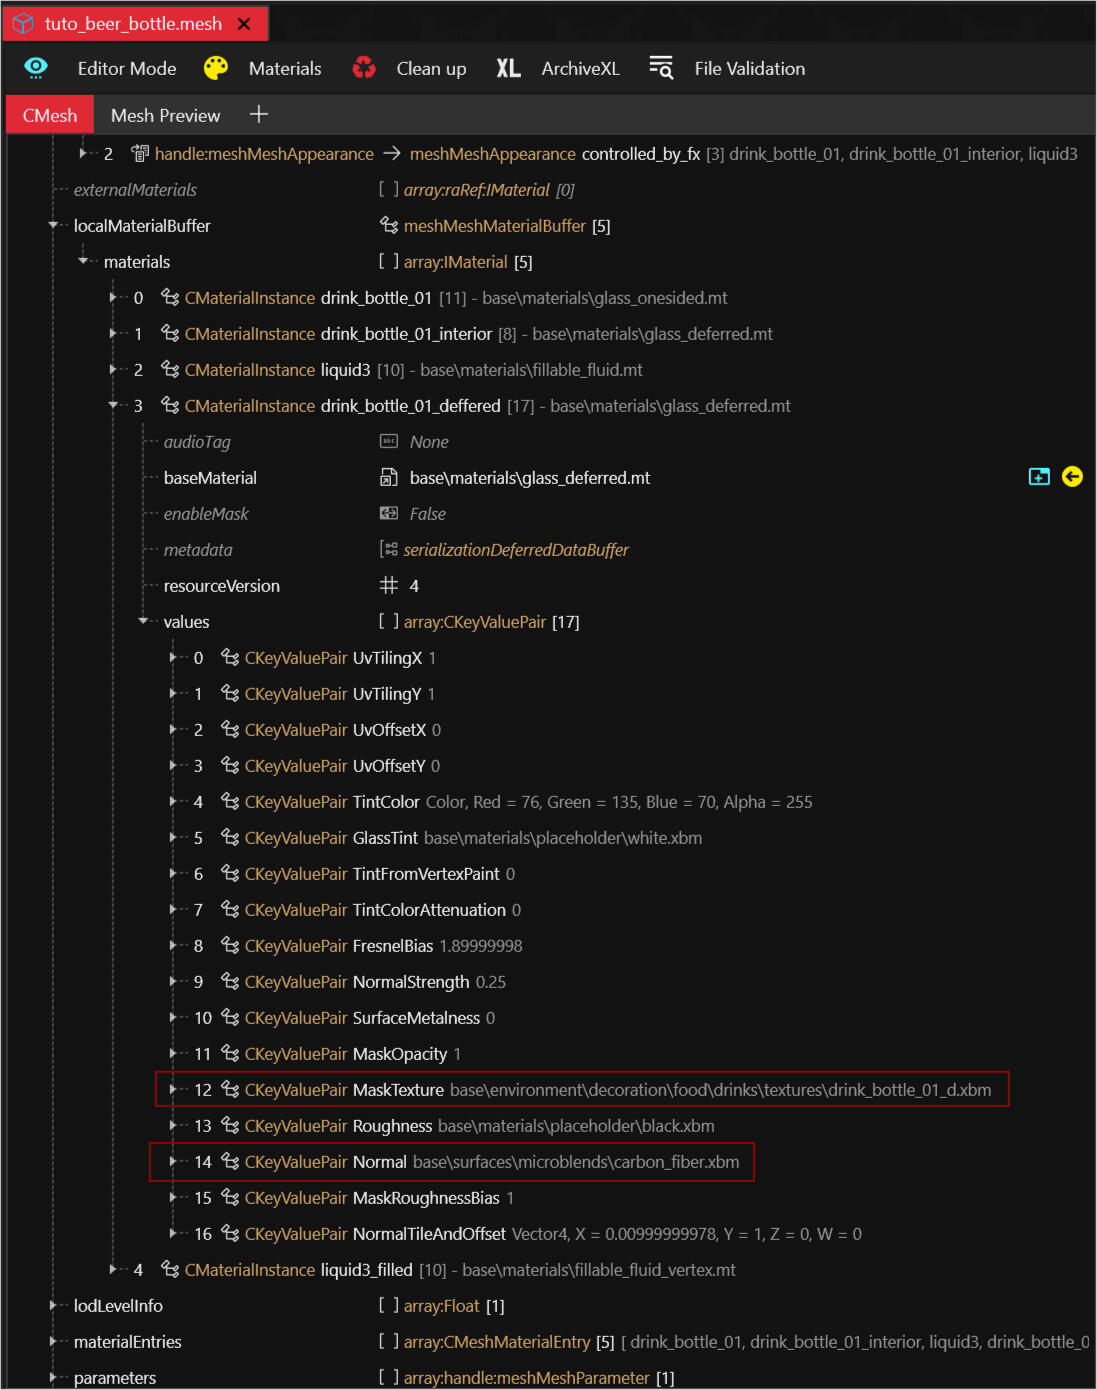
Okay now that we know which submeshes we need open up the localMaterialBuffer. Here we find the materials we need to work with. As you can see in the image below all five different submeshes are here for the three different appearance for this bottle. For your own item find the CMaterialInstances you need and open those up. Ignore the rest in fact you can remove those but that requires a bit more work. I will explain how to do that properly at the end of the tutorial since it's not a must.
So in the screenshot it may seem like a lot but we have very little to do here. Just know the list isn't always this long. The materials you are looking for is anything that looks like a full path. As you can see below I have two that I want to make local. You might be thinking but what about the GlassTint and Roughness but those are placeholders as it says in the path. You do not need to touch those.Roughness and Normal maps usually need replacing and you will find them in all items. MaskTexture can also be called baseColor. Thing is it just depends per item and how it is set up. The easiest way to keep track is just looking at pathing. Does it have a path? Yes? Cool you make it local unless it's a placeholder.Rarely do you need to adjust the baseMaterial at the top. I wanted to mention it real quick since it has a path. You absolutely can make it local if you want but I have yet to find an instance for poses where that is absolutely needed.
Open the materials you need to add to your project and press the little yellow arrow. This will quickly add the files to your project so you don't have to find it in another way. Move the files to whatever folder you want them in and remove the folders that are no longer needed.
Now we get the path for each material and paste it into place like we have done for other things. Once you have that done press save in top left and close the mesh. You are done with the mesh!
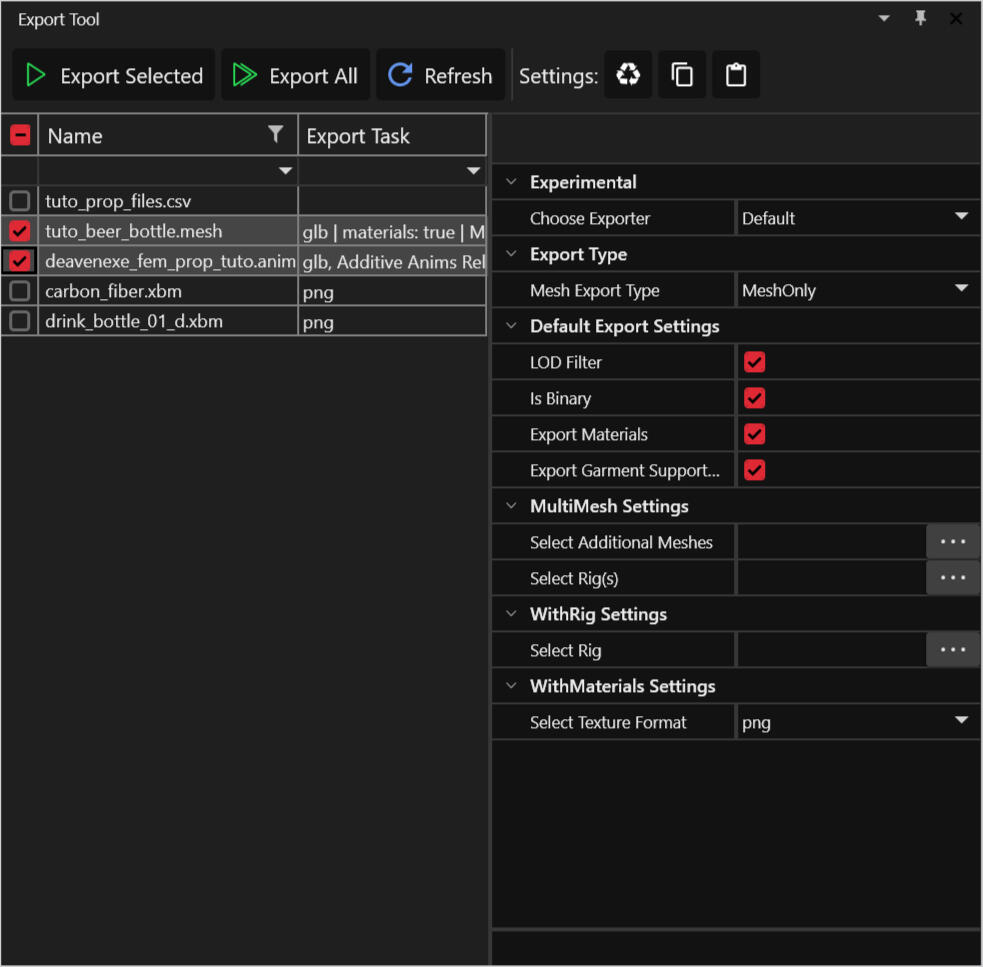
Alright we technically have some more pathing to do but you know what? Let's go do something more fun first! In the export tool select your anim file(s) and your item(s) mesh. Export them and let's go make a pose!
Posing with your item in Blender
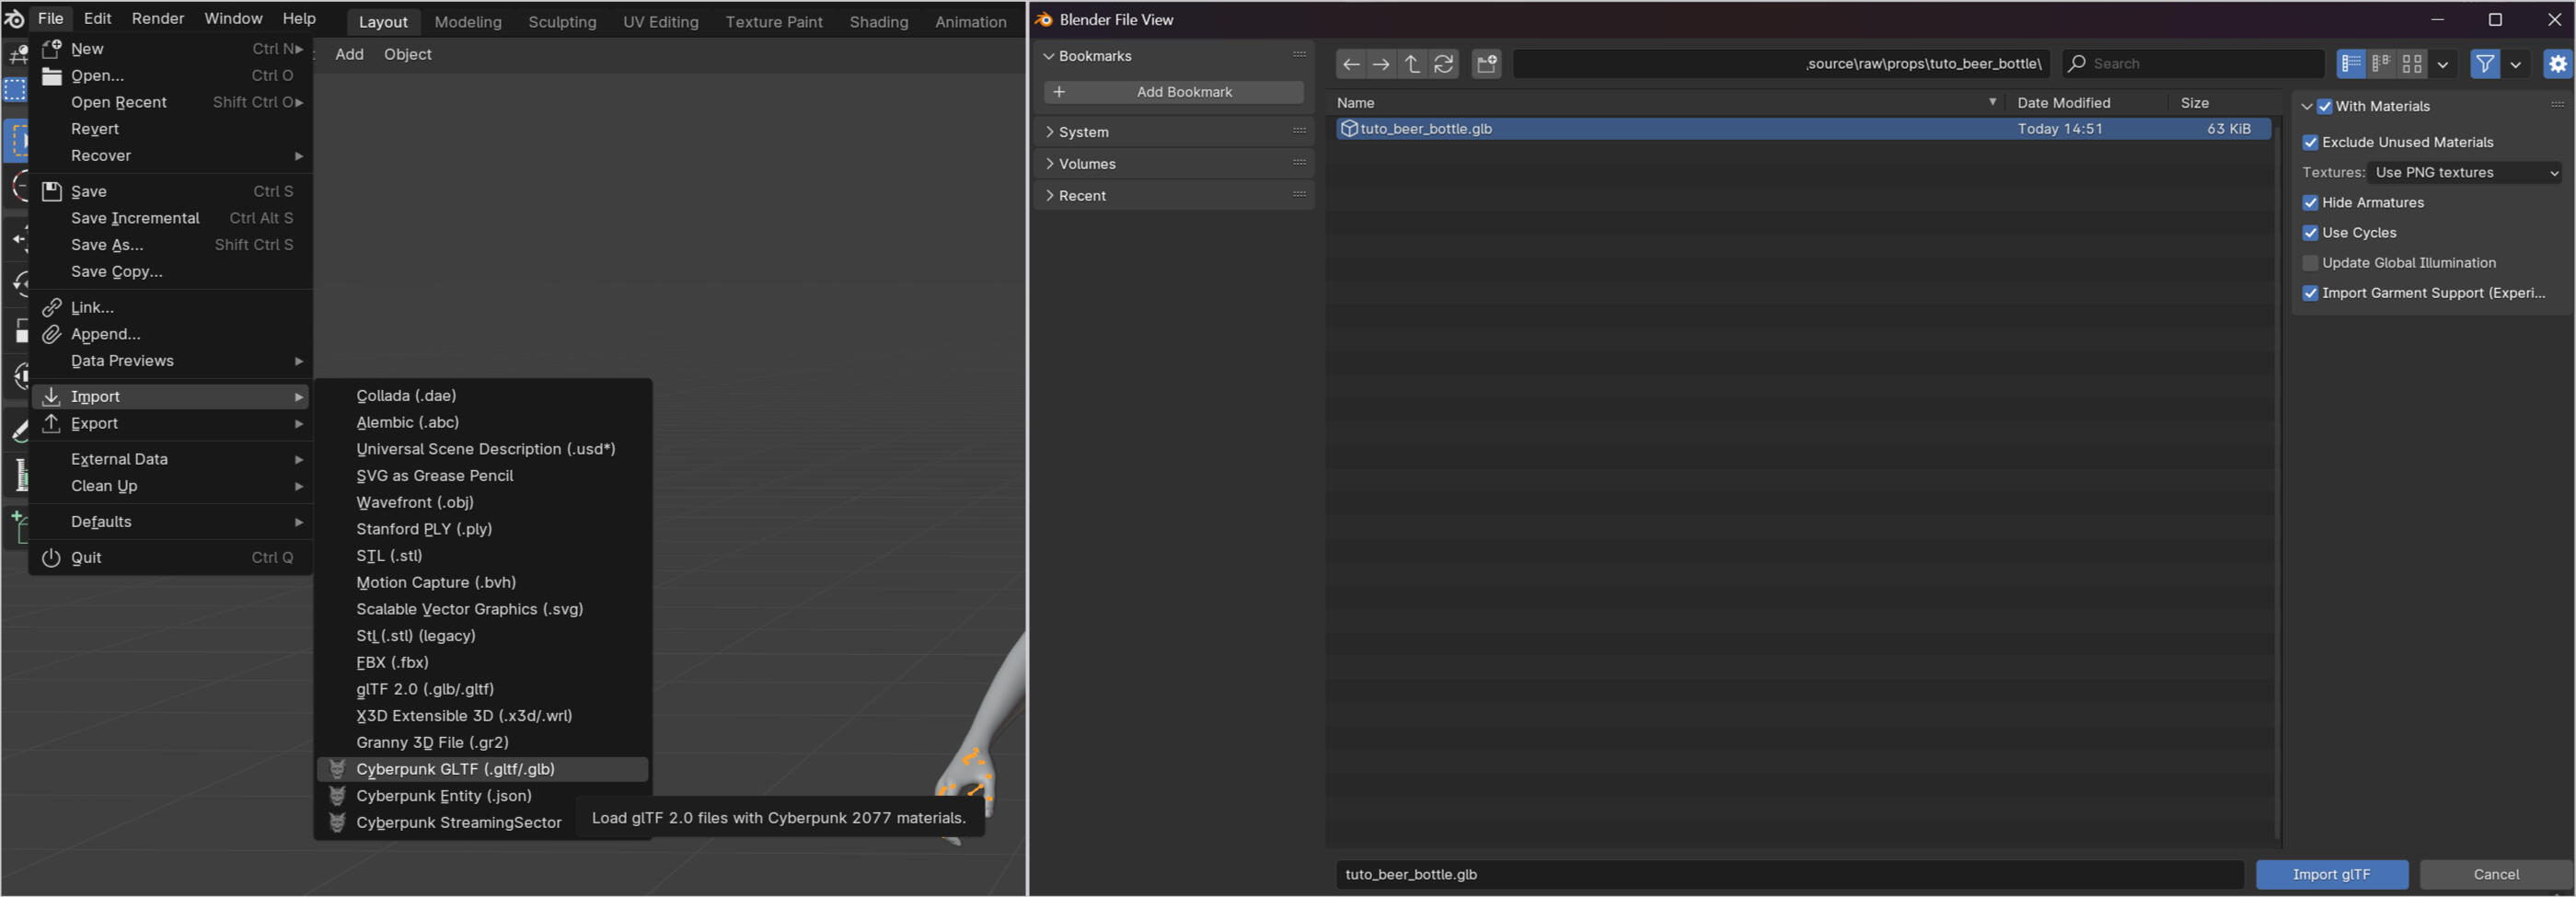
Alright so I am using the fem body but it's the exact same for masc so there is no differences to keep in mind! Male big does not have a working prop bone as far as I know so this won't work for them. Now let's import your item! If you're not sure how importing works don't worry I got you!In object mode go to file, import, Cyberpunk GLTF. It'll open a screen, find your Wolvenkit project and then find the item you just exported. I found the bottle by going to the project folder, source, raw, props.
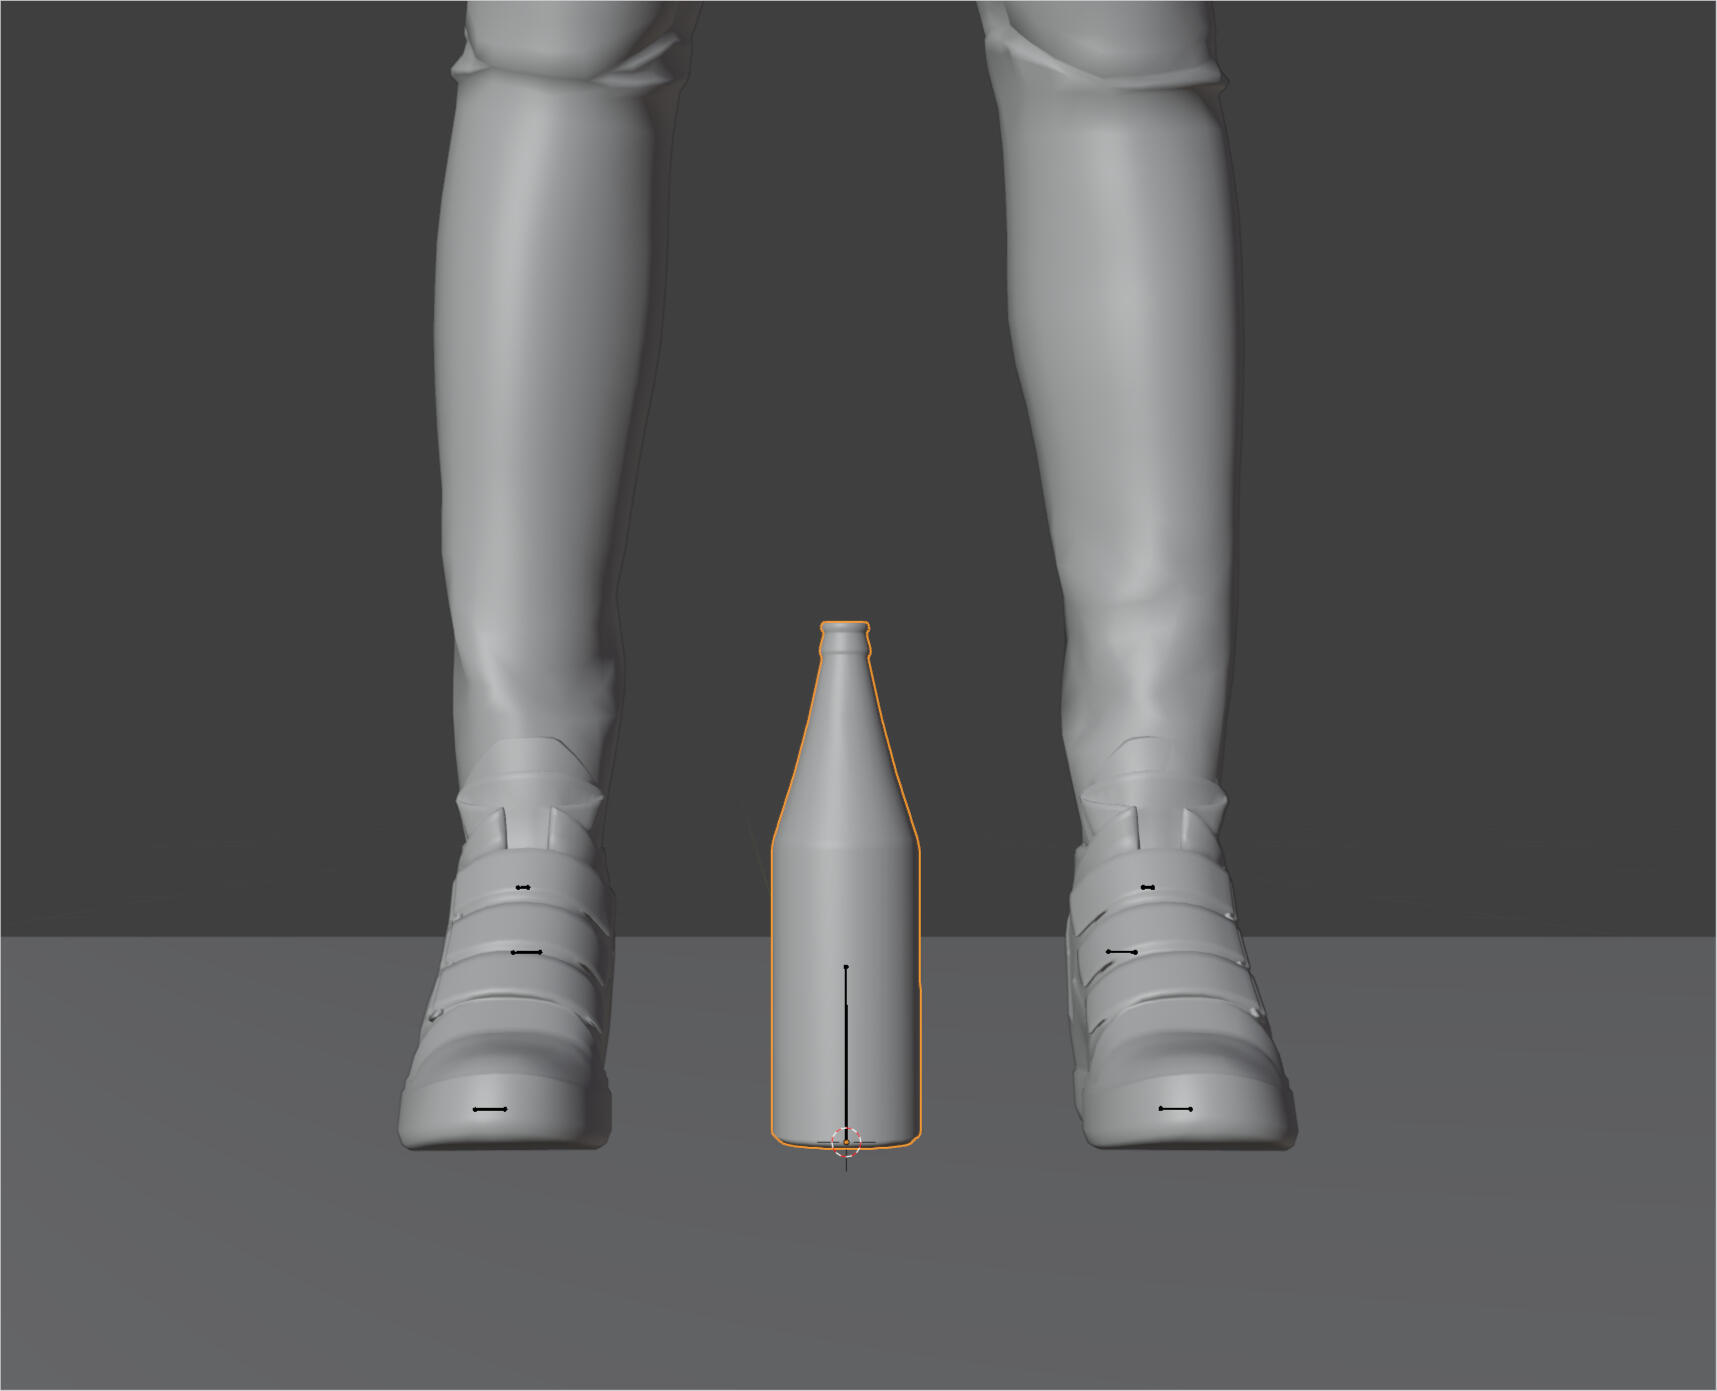
Once imported it will be at the bottom by the feet. If your prop isn't there but floating around somewhere, which does happen with some props, then prepare for a lot of posing pain. You can still follow all the instructions but you will have to check the pose in game and adjust the prop accordingly. I have yet to figure out how to make that easy luckily its only a very select few items so you should mostly be fine. (If anyone reading knows how to solve that please share! It may save someone a lot struggling)If you are using the IK bones model you may notice that the bones have become smaller. The way to prevent this is to not import it directly into the model file but instead import it into an empty blender file then copy and pasting it from there into the model file. Everything else will still work the same and the IK bones won't be small and annoying to work with.
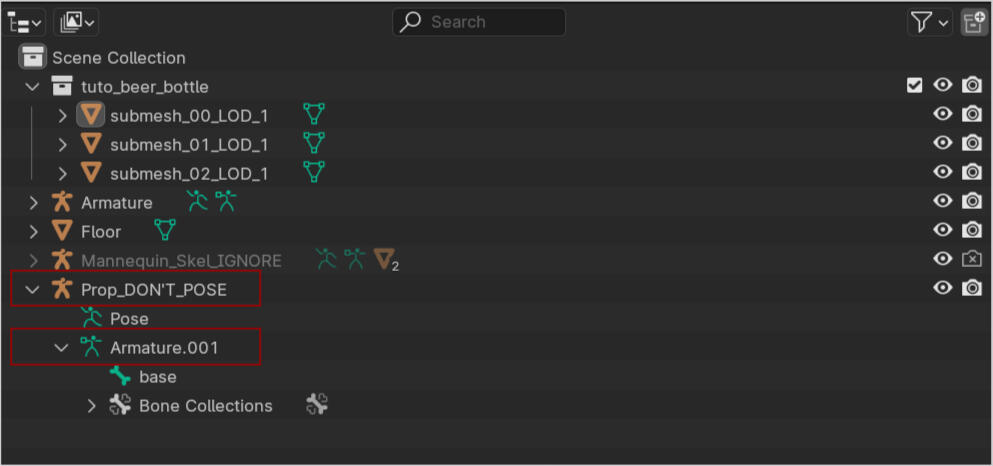
In your scene collection open up the Prop_DONT_POSE file and open up Armature.001 so you can see the bone called base.
Select all the submeshes of your item and switch to edit mode.
Go over to the Data tab (the upside down triangle). Next to Vertex Groups press the + symbol, double click on Group, change the name from Group to base (no capitals) and press assign. Do this for every single submesh. Then select all the submeshes again and switch back to object mode in the top left.
Select all the submeshes again and then select the Prop_DONT_POSE base bone. It has to be done in that order! Do not select the base bone first and then the submeshes. It won't end up working right. Move your cursor over to the viewport (where your model is) and press Ctrl + P a little window should open. Select With Empty Groups.
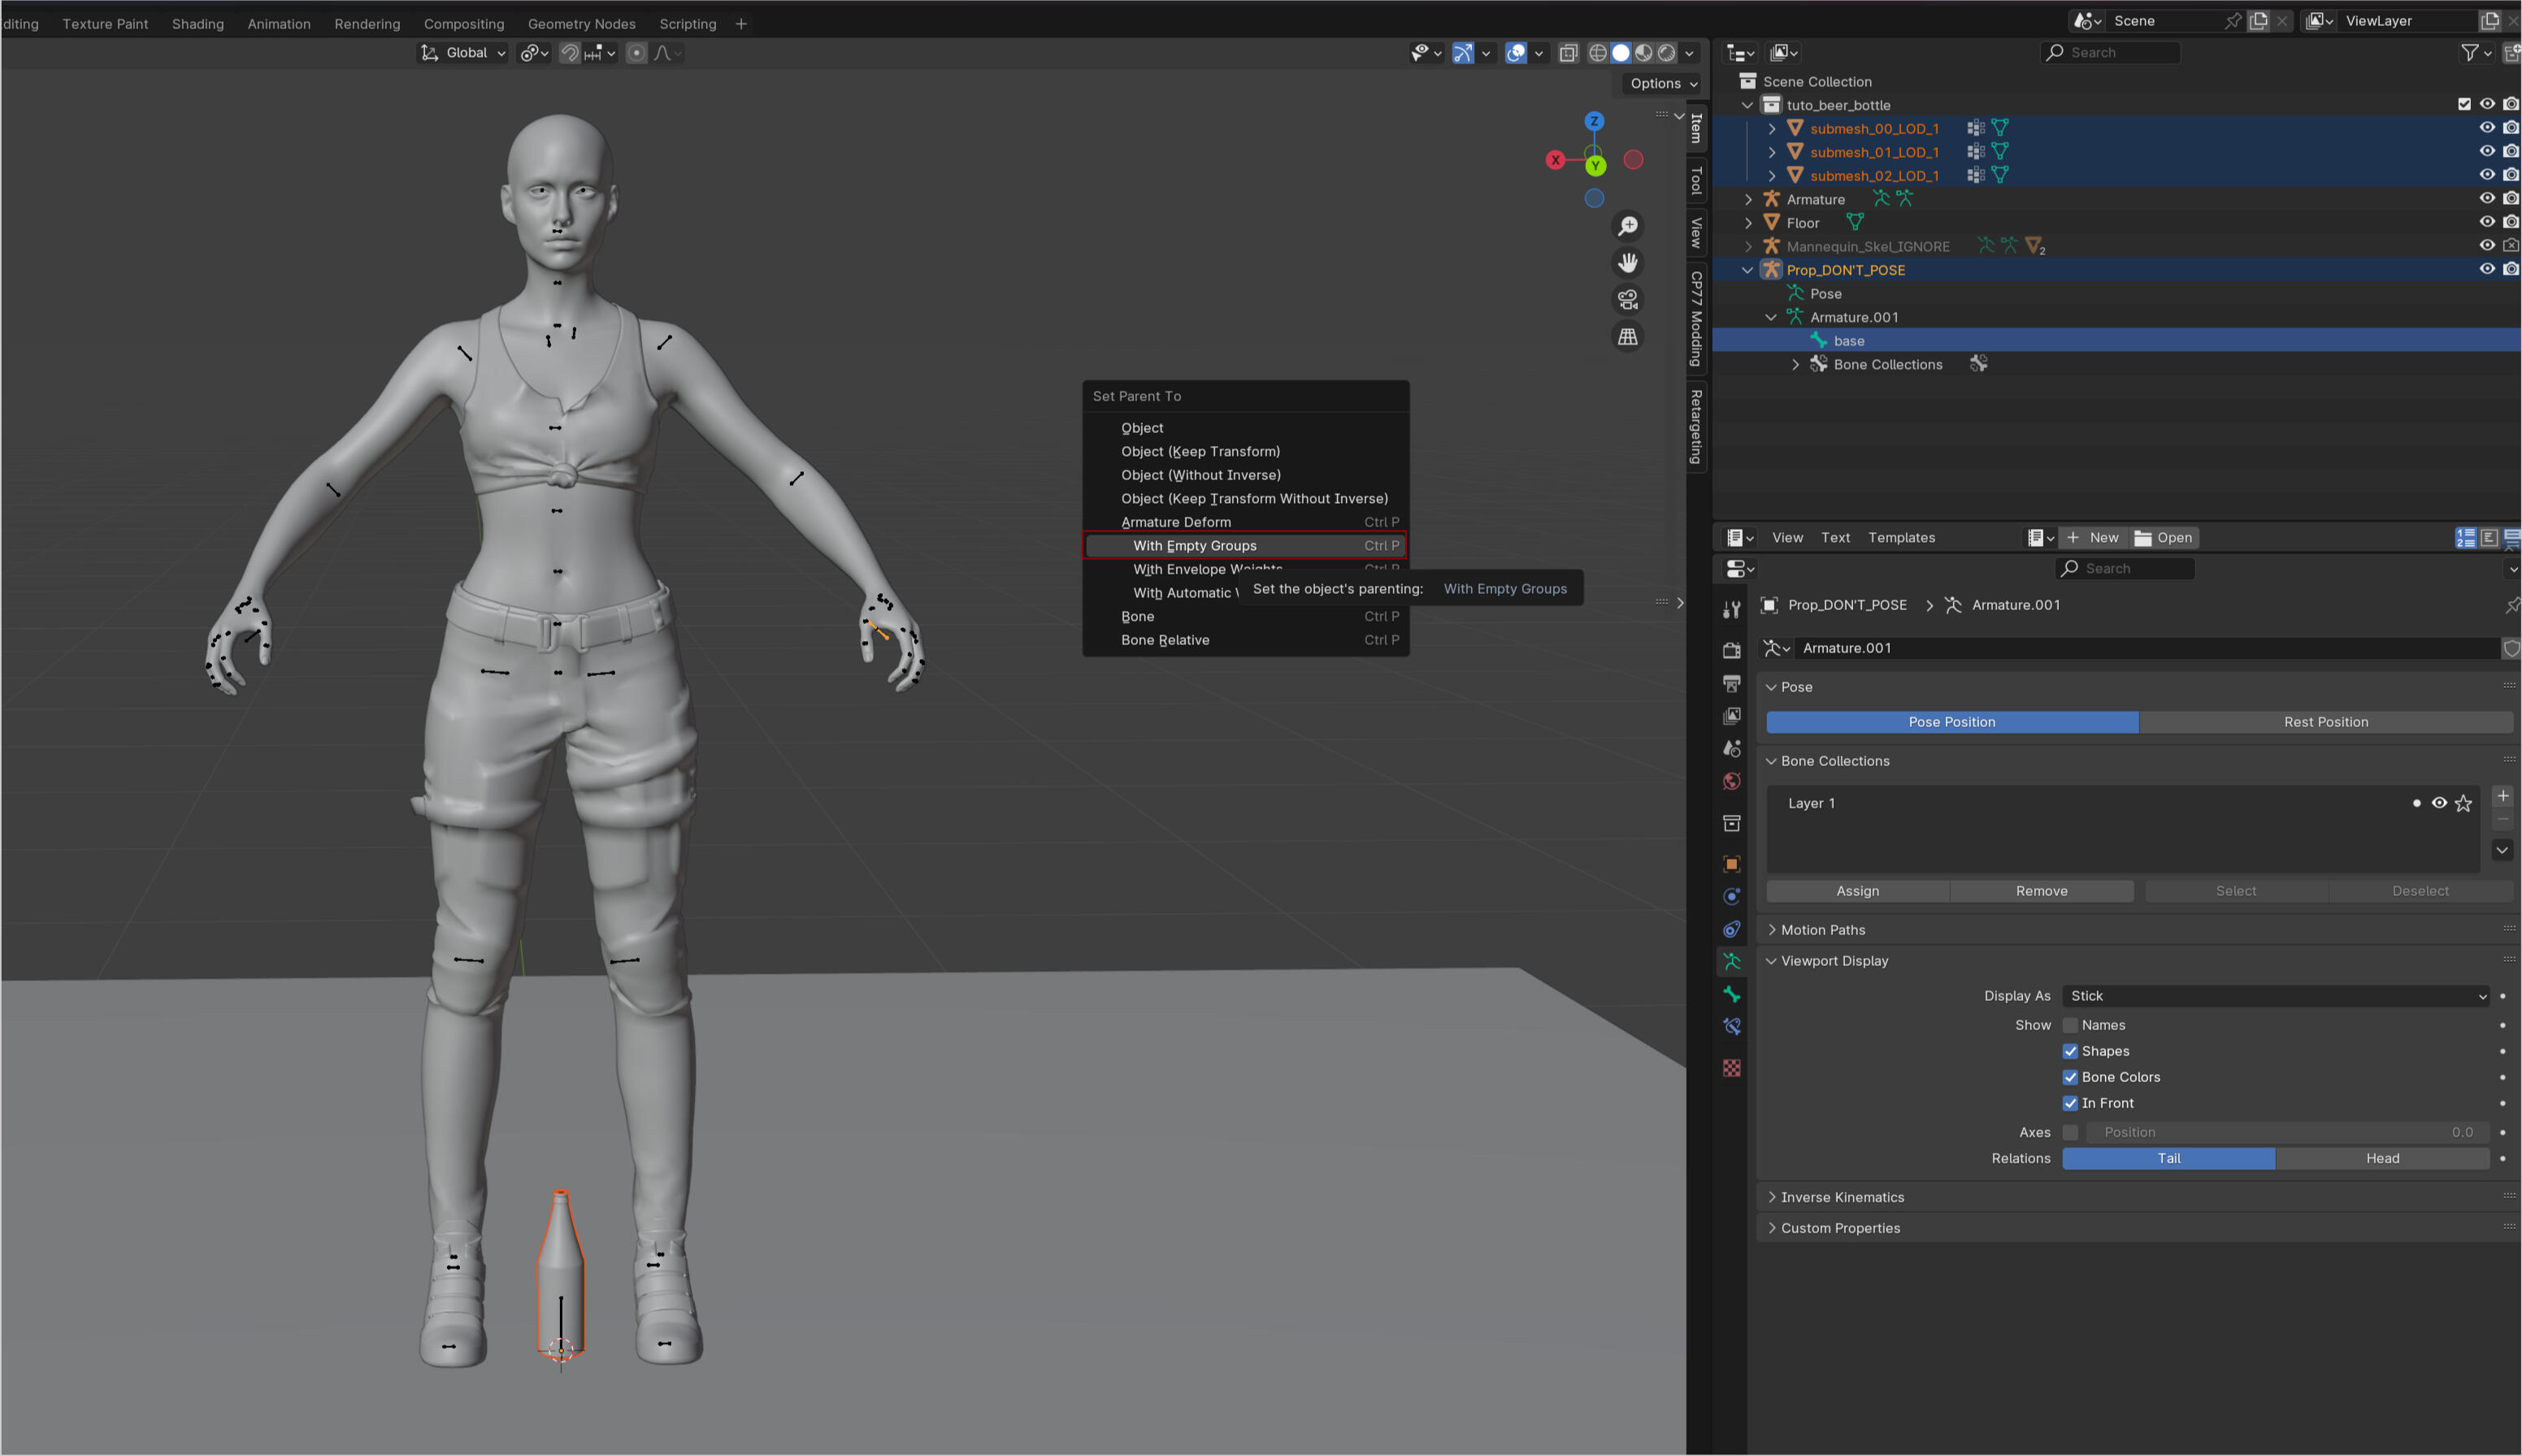
Now not only do the submeshes move to Prop_DONT_POSE in the scene collection but you should see your prop move up to the models hand! It is now attached to the prop bone which will allow you to pose the prop! Occasionally it will just stay at the ground, restart the blender process until it works. I haven't figured out why it sometimes acts stupid.
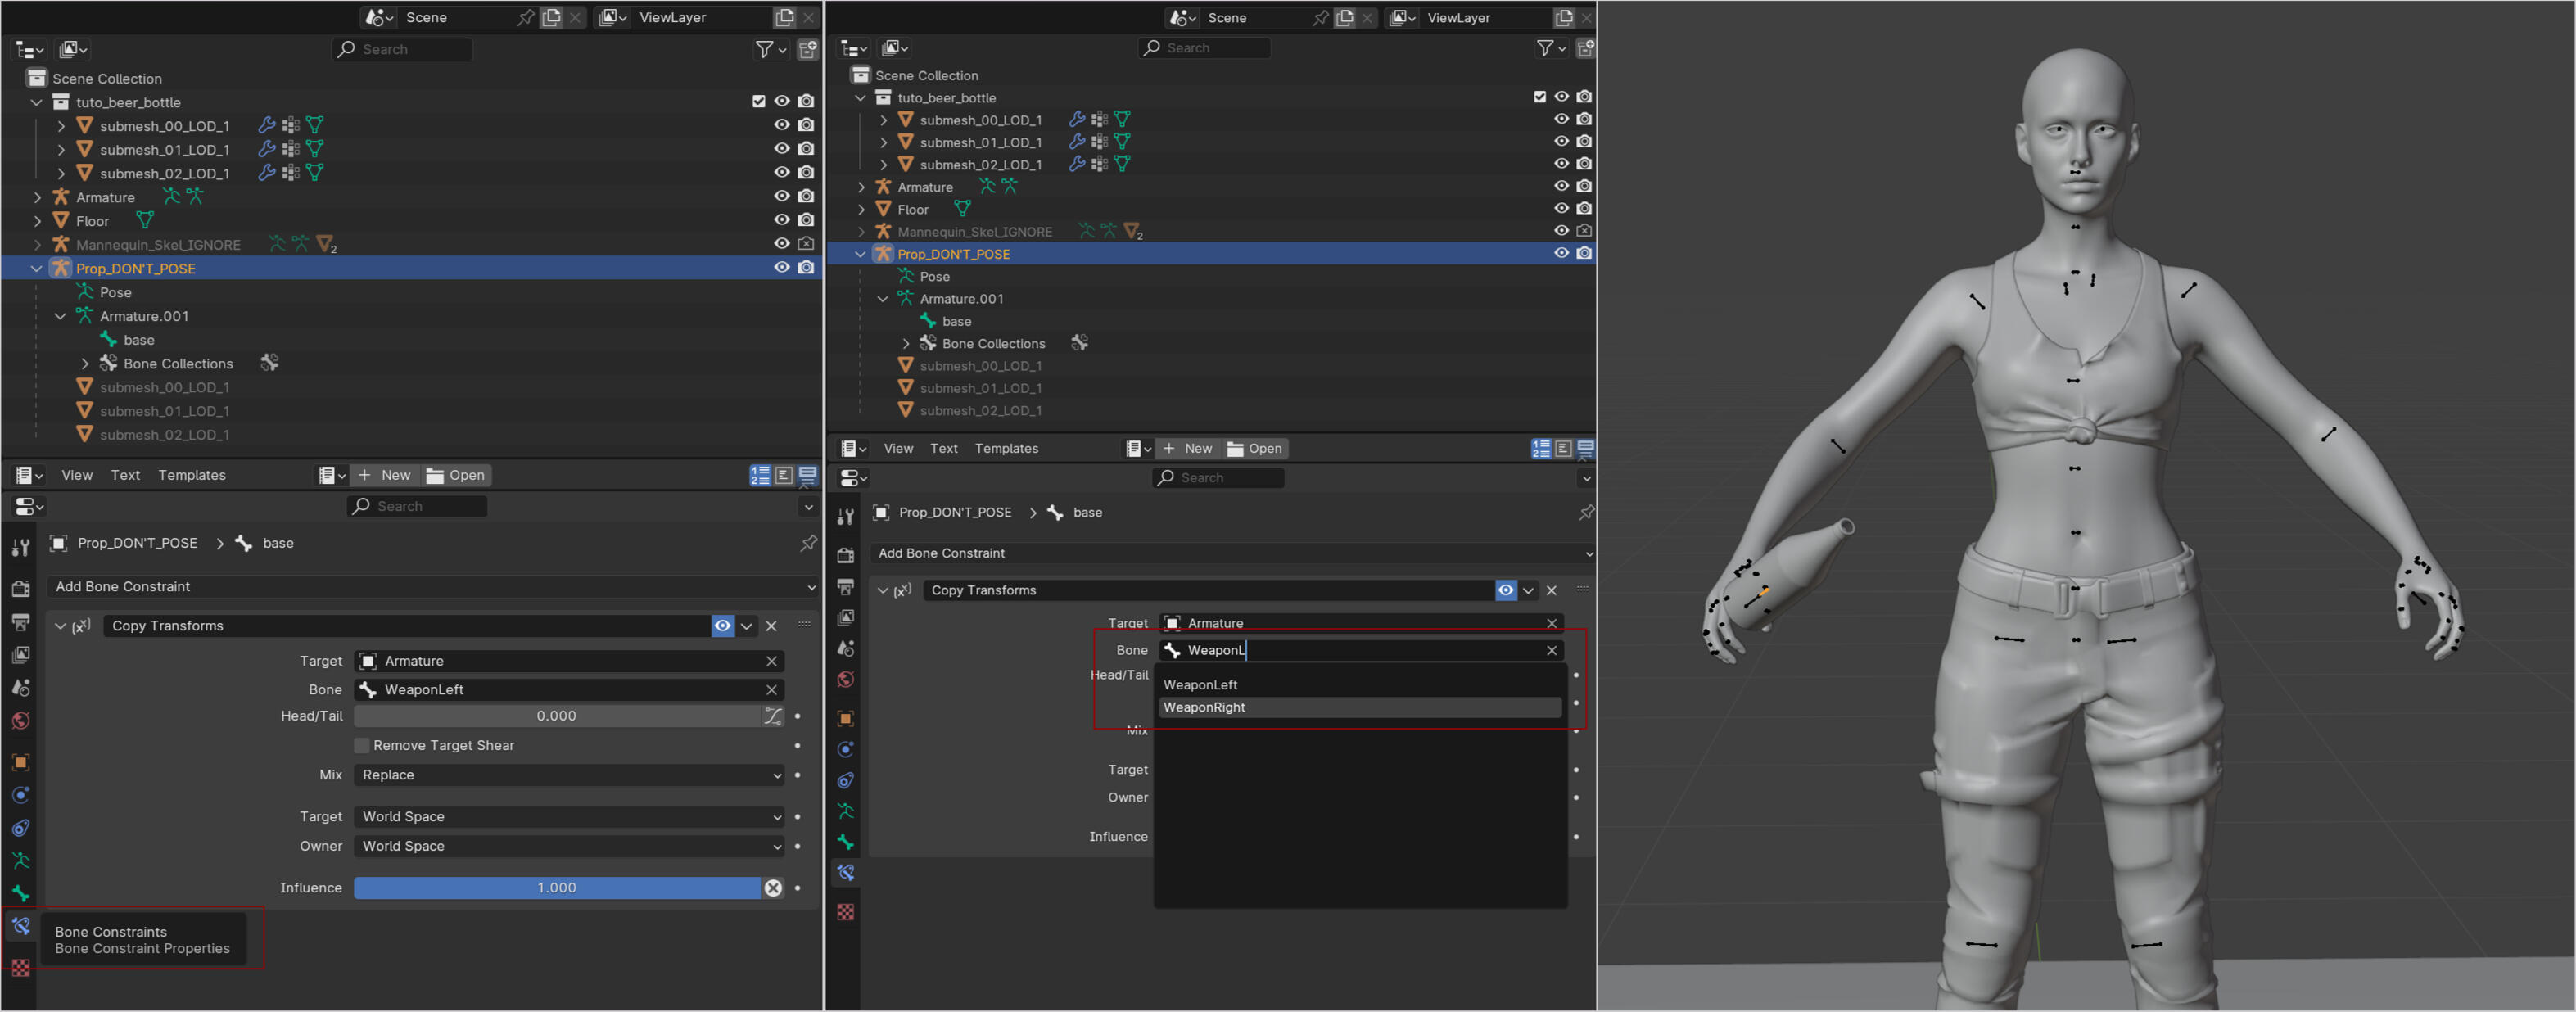
Now one last thing you can do in object mode is select Prop_DONT_POSE and then select the bone constraints tab. Current bone selected is WeaponLeft. That is what your prop is attached to. You can change it to WeaponRight if you want the prop to be in the right hand. To be clear even though there are two weapon bones we can only attach one prop total. No dual wielding sadly. :(
Posing time! Switch to pose. Your prop will move along with the arm bones and upper body bones.
Now to move the prop itself you use the blue bone. You can move it anywhere and that is where your prop will show up in game. So go wild!
Get your prop where you want it to be and once you are done with the pose export the pose as you normally would. There is nothing special you need to do since you moved the prop bone where it needs to be and it always exports along. Back to Wolvenkit we go for more pathing in the paperwork!
Last steps!
Import your poses, change the animbuffer number and stuff. If you are pulling the mesh from the game instead of making it local you can now remove the mesh from your project since you only needed it for posing.Now we have some last paperwork to do and pathing within the paperwork.Open up your xl file. Change the link under factories to the path for your csv. Save and close.
Next open up your yaml file. We'll be changing a bunch of things here.POSE_PROP_UNIQUE_LOLLIPOP_L needs to be adjusted to have your item name. It is not needed to keep it in caps I just prefer to do so to quickly spot it. What you will need at the end is _L or _R. This indicates if it's for the left or right hand. Further down in the sentence change the name to your item name. Then at the end of the sentence you see WeaponLeft. You can keep that if you are using the left hand. Change it to Right if the prop should be in the right hand.You will have to copy and paste that whole line and adjust for each item and each hand you use it for. You can easily list them under each other.Next is the little block under it. You probably already guessed it but all those need to match your item name. It needs to be the same as in the csv. This is why I suggest just having it all be the same name cause it's easy to keep track of and nothing can go wrong when connecting these things. You can copy and paste the block for each item you want to use (does not need to be for each hand just each item).Then last is indicating which item you want for which pose. Find your pose and behind acceptedWeaponConfig you can remove the POSE_HIDE_WEAPON and replace with the bit from the itemDefinition above with the _L or _R behind it. Again doesn't have to be in all caps but can be if it helps you find stuff easier.Don't forget to save once you are done!
Now install and check if everything works! That's it! That is how to add a prop to your poses. It's quite a lot but once you get the hang of it it's super easy and you'll become quick at doing it in no time.I would suggest making a base project file for poses with props where you have the csv and ent file already in the project and the xl and yaml file already have the right bits in it. Then you can just copy the source and paste it into any new pose project you start. Saves time with copy and pasting things like at the beginning of the guide.If you have any questions feel free to contact me! I am always happy to help! Happy pose making!

Mesh Cleanup
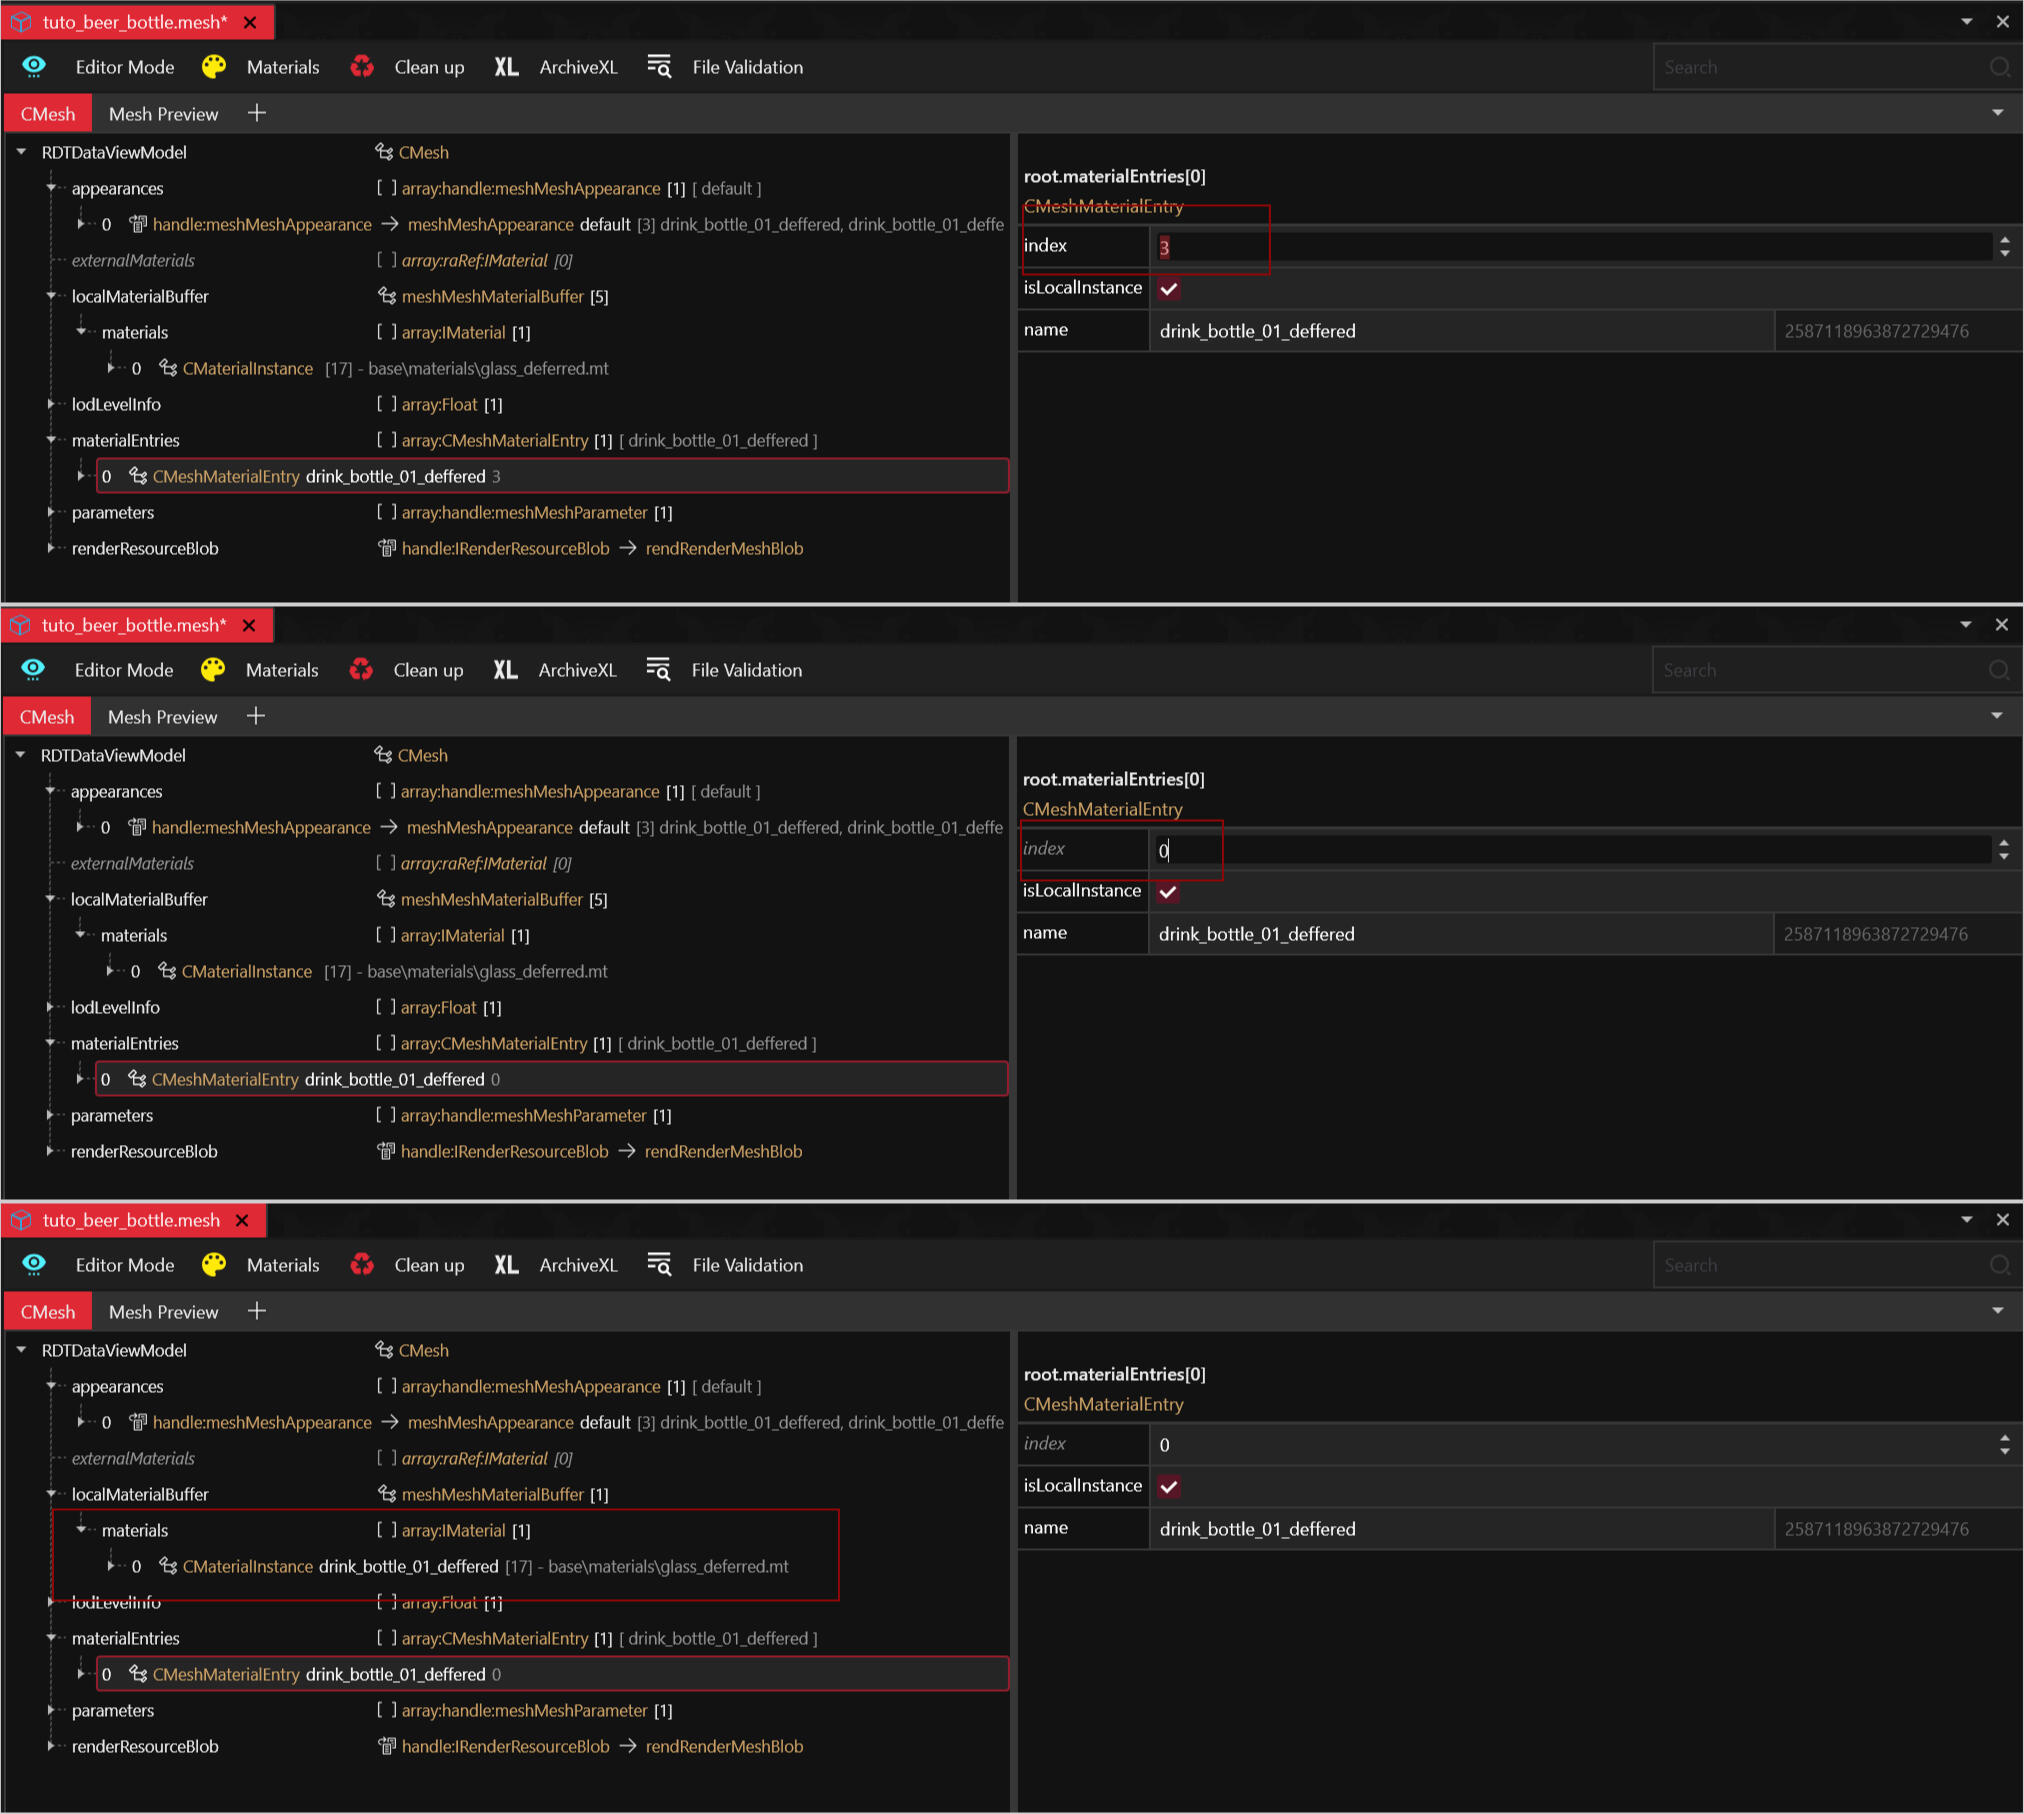
So earlier in the guide I mentioned removing appearances from the mesh. It's not a must but it might help with the prop loading quicker if it's taking a while in game. Overall cleaning these appearances up is pretty straight forward and easy but if you have never done this there is one part that is important to keep in mind and fix or your appearance may end up not working.So to start I am using the default appearance for the bottle. We already established in the tutorial I only need the drink_bottle_01_deffered. So in the right image you see I have deleted the other two appearances and removed four MaterialInstances. Just select them and right click then select delete. However you will also see that the MaterialInstances left is now called drink_bottle_01 while its clear that I adjusted the pathing in it so that is the original drink_bottle_01_deffered.
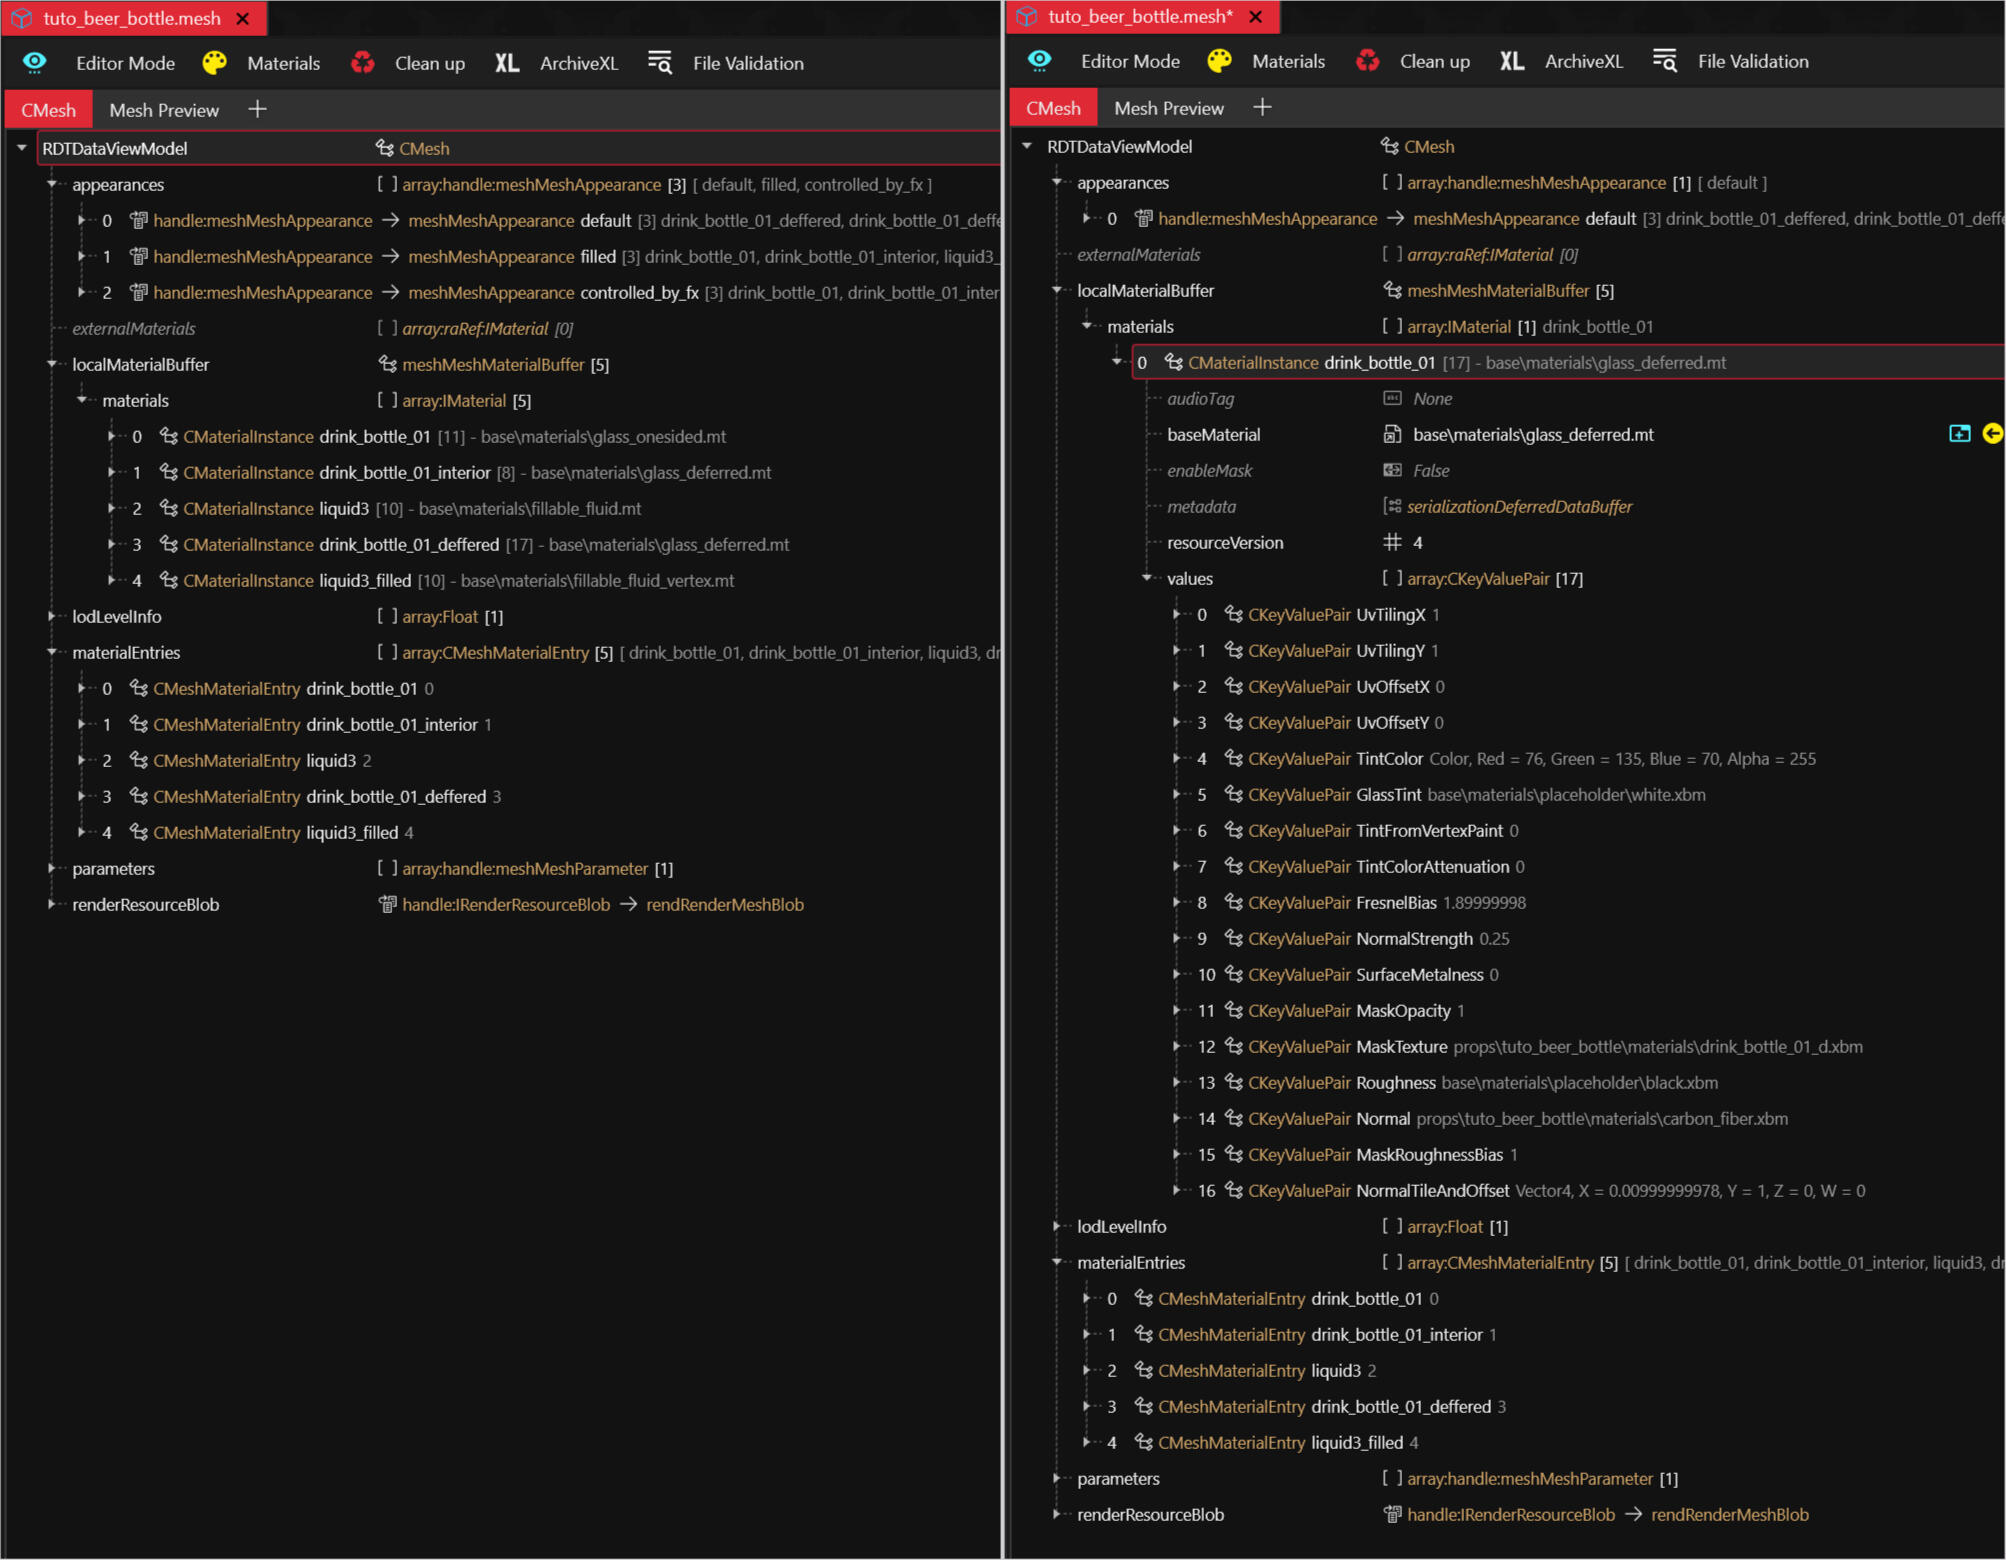
The reason the name is different is because of the materialEntries that you can see I opened up in the above images, its in lower part of files. Since the MaterialInstance is now in spot 0 it takes the materialEntries 0 name. This is really easy to fix but if you have never worked with this before it may not occur to you instantly.So delete the other materialEntries so the one(s) you need are left. Then click on the entry you need and on the right side you will see index # in this case 3. Change that to the number matching the MaterialInstance so 0 for this prop. Wolvenkit used to fix it immediatly after changing the number but for me it no longer does so if it doesn't for you just press save, close the mesh and reopen. As you can see in the third image it now has the right name and so the right appearance will load!That's it. It's super easy once you know how but again if you have never worked with this it may not instantly be clear.